Run 8 → Create Issues, Dashboards, Events & Markers
Introduction
Now you have your Users and their Roles defined, let's add Forms and Dashboards using Templates.
In this lesson, we'll use Templates to create Issue, Event, and Lost and Found Forms, along with their related Dashboards. We'll also throw in an Event Controller and some Event Markers for good measure.
Then, we'll test drive the Forms and the Dashboards!
- You'll be able to test the Forms and Dashboards using a Mobile device
- Read the latest in our Run 8 article →
- If you need to practice
- Work through the 'Try it!' checklists in your Sandbox (Thunderhawk Arena)
Try it!
→ on Event Computers
A. Start by reading → About Forms, Fields & Dashboard Templates (5 min)
B. Then return here and complete this Hands-on Checklist
Hands-on Checklist
-
Log into Guard IQ on your Event Computer → Hint ✋
-
Open Thunderhawk Arena organization → Hint ✋
-
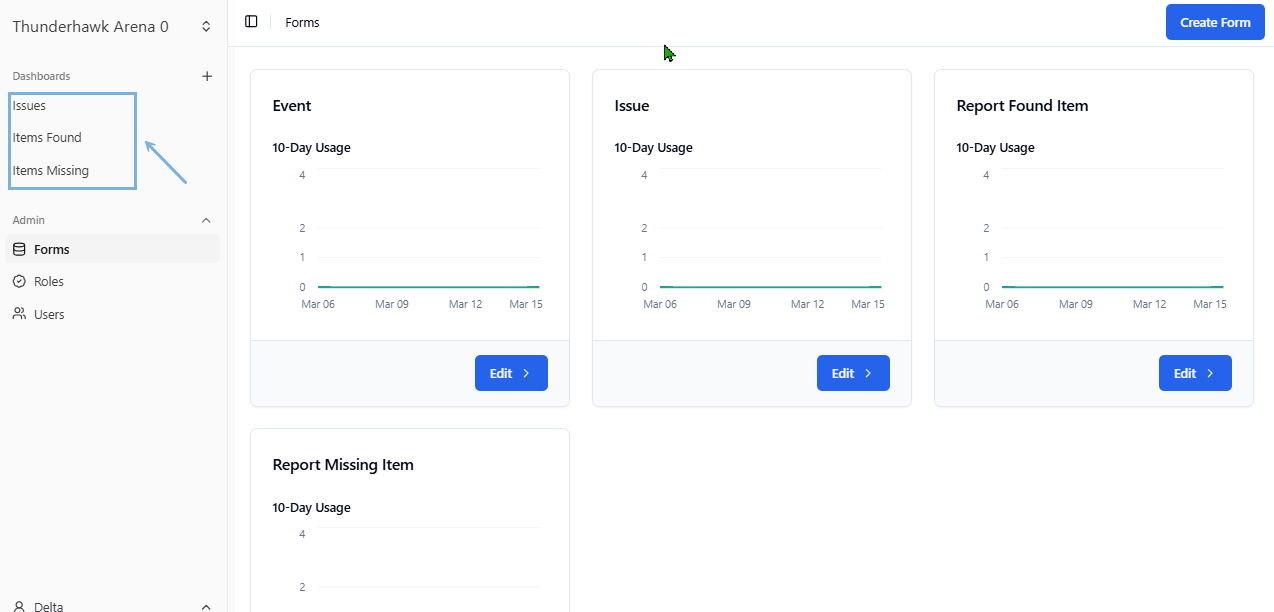
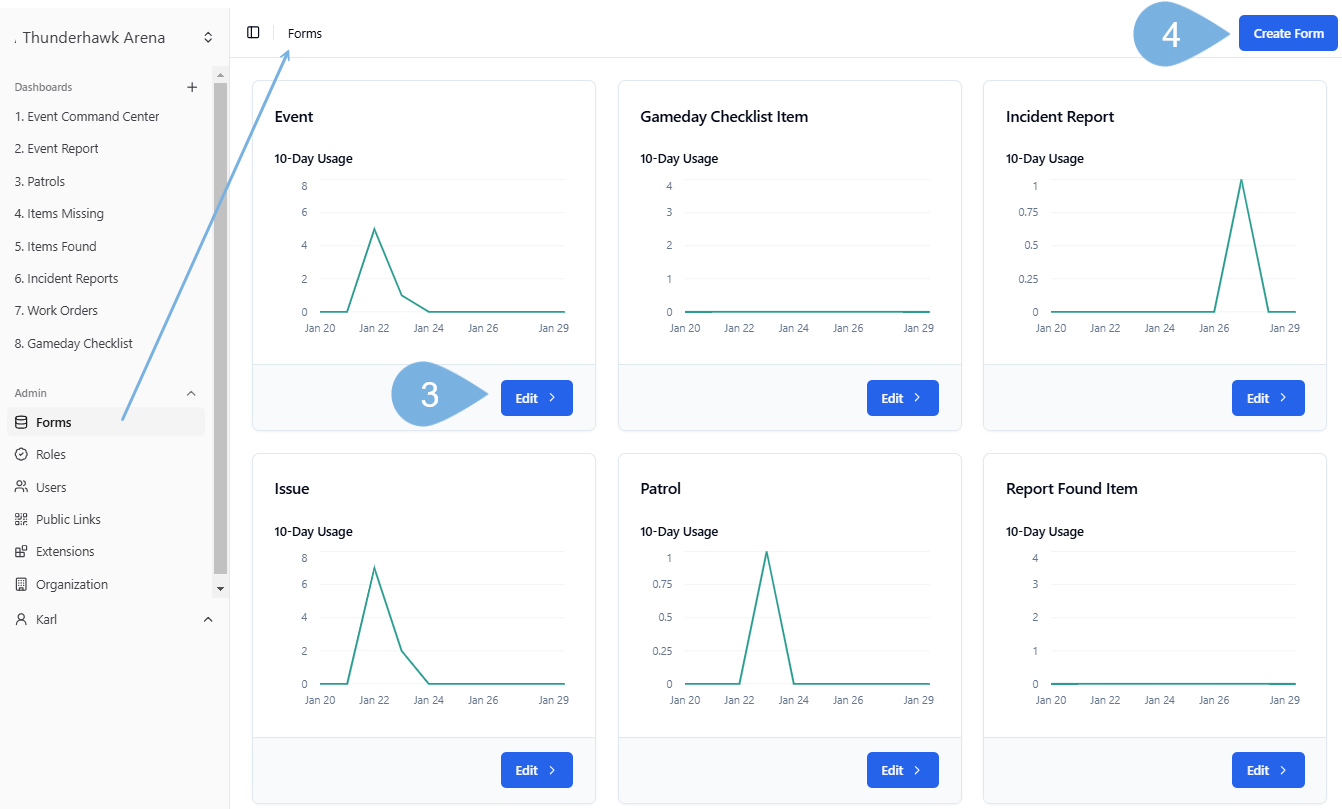
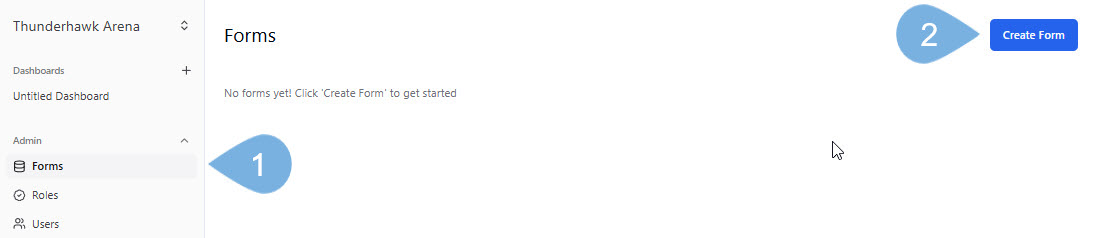
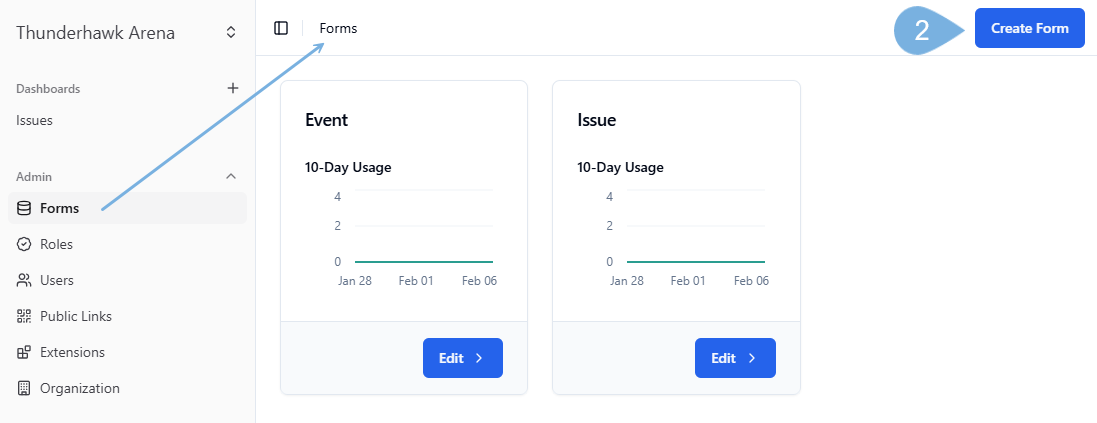
Click Forms from the Admin menu → and then select + Create Form
-
Create 3 new Forms, their Dashboards, and Event Controller assets:
-
Click Forms again to see your 4 new Forms!
-
Notice the 3 new Dashboards too! → click each of them open from the Naviatation panel
Create an Event with Markers
-
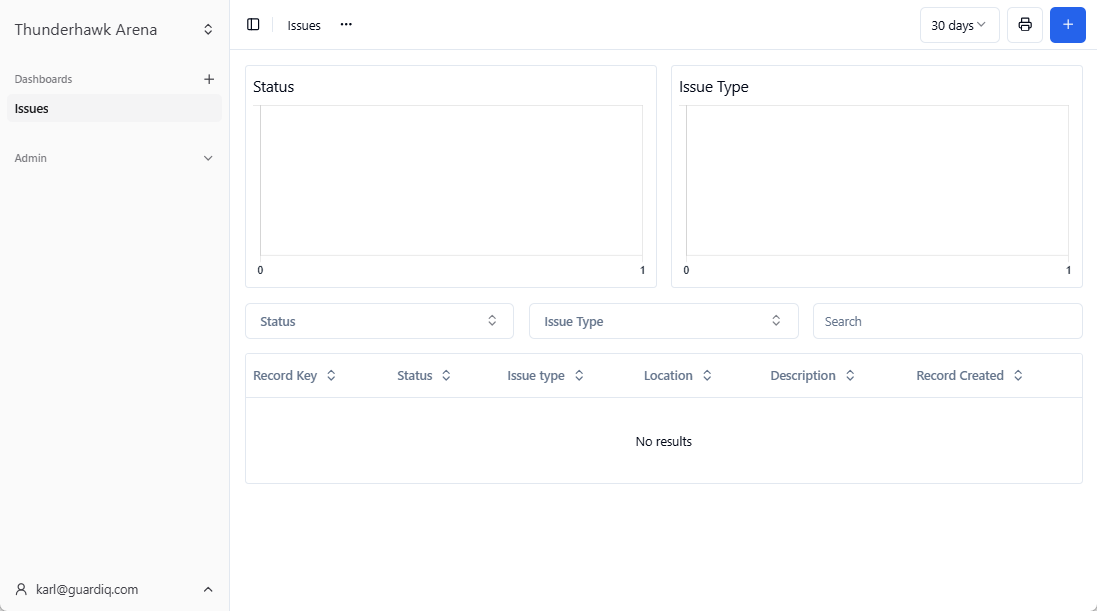
Open Thunderhawk Arena and your Issues Dashboard
-
Click + Blue Create Record button → Hint✋
-
Select the Event form → Hint✋
-
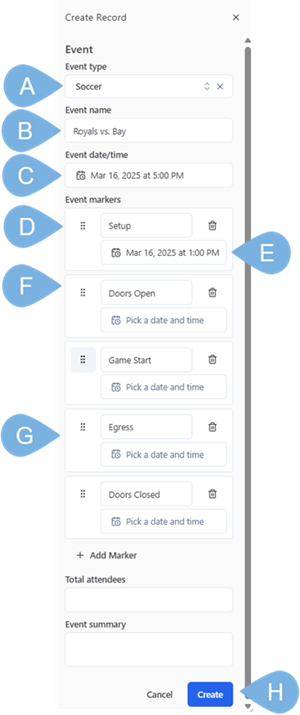
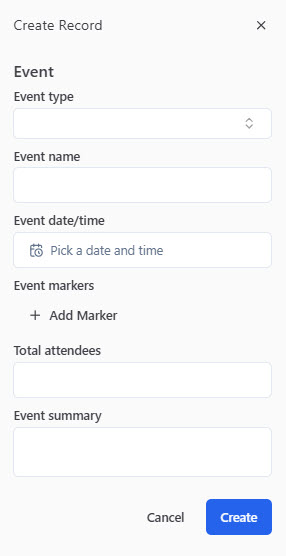
Start your game today by selecting and entering the following → Hint✋
- A. Event Type → pick Soccer
- B. Event Name → Invent your team names
- C. Event Date/time → Pick the current day with an early evening start time
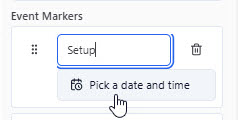
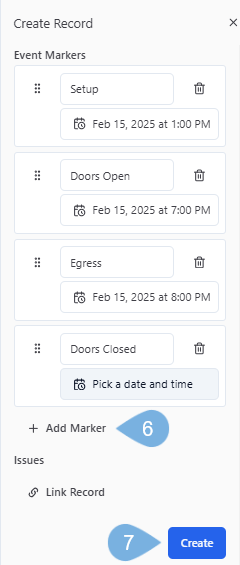
- D. Add the 1st Event Marker → type in Setup → Steps ▶
- E. Pick a time several hours before the event to start setting up
- F. Add additional Markers*:
- Doors Open
- Game Starts
- Egress
- Doors Closed
- G. Click Create
- We kept things simple for this simulation, but Football/Soccer may have many more markers:
- Setup
- Doors Open
- First Half
- Halftime
- Second Half
- Extra Time
- Penalty Shoot-out
- Egress
- Doors Closed
- Click here to visit our list of Lists and Markers
→ on Mobile Devices or Event Computers
Hands-on Checklist
Create Four Records
-
Click Home to go to your Issues Dashboard and select YOUR game (from step 5) → Hint✋
-
Click +Create to add a new Record → Hint✋
-
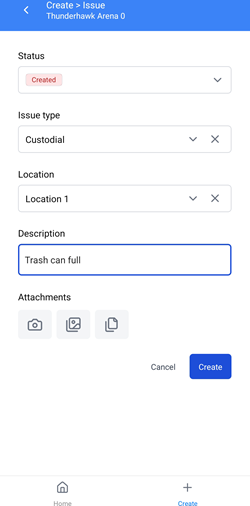
Create a Record with the Issue Form → Hint✋
- Issue Status → ex. Created
- Issue type → _ex. Custodial
- Location → ex. Location 1
- Description → ex. Trash can full
- Click Create
-
Create another Record with the Issue Form → Hint✋
- Issue Status → ex. Created
- Issue type → _ex. Medical
- Location → ex. Location 2
- Description → ex. Bee sting
- Click Create

-
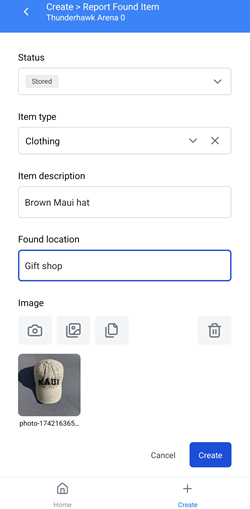
Open the Report Found Item Form → Hint✋
- Status → ex. Stored
- Item type → ex. Hat/Cap or Clothing
- Description → ex. Brown Maui Hat
- Location Found → ex. Gift Shop
- Picture → ex. Take a picture to practice
- Performed by → Erik
- Click Create
-
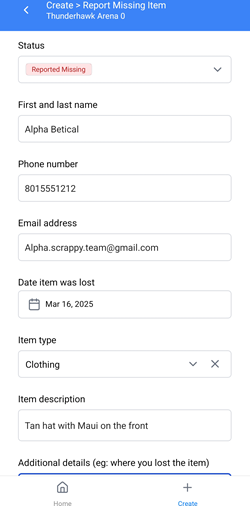
Open the Report Missing Item Form → Hint✋
- Status → ex. Reported Missing
- First and last name → ex. Alpha Betical
- Phone number → ex. 8015551212
- Email address → ex. alpha.scrappy.team@gmail.com
- Item type → ex. Clothing or Hats/Caps
- Date item was Lost → ex. Today's date
- Description → ex. Tan hat with Maui on the front
- Additional details → ex. Lost in shopping area
- Click Create
-
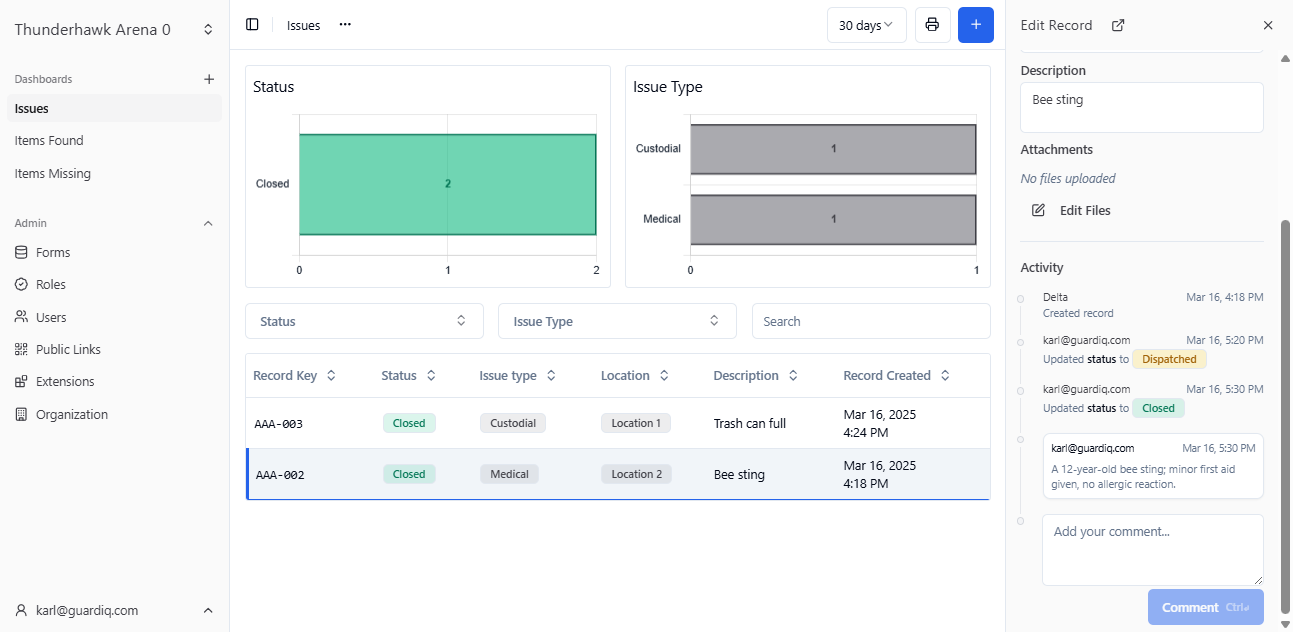
Open your Issues Dashboard → Hint✋
- You should see your two Open Records
-
Dispatch your Medical incident to your EMTs → Hint✋
-
Move your Custodial issue to On Scene → Hint✋
-
Move your Medical Record to On-sceneHint✋
-
Close the Custodial "Trash can" record → Hint✋
-
Close your Medical incident with a note at the bottom in the comments section "A 12-year-old bee sting; minor first aid given, no allergic reaction" → Hint✋
-
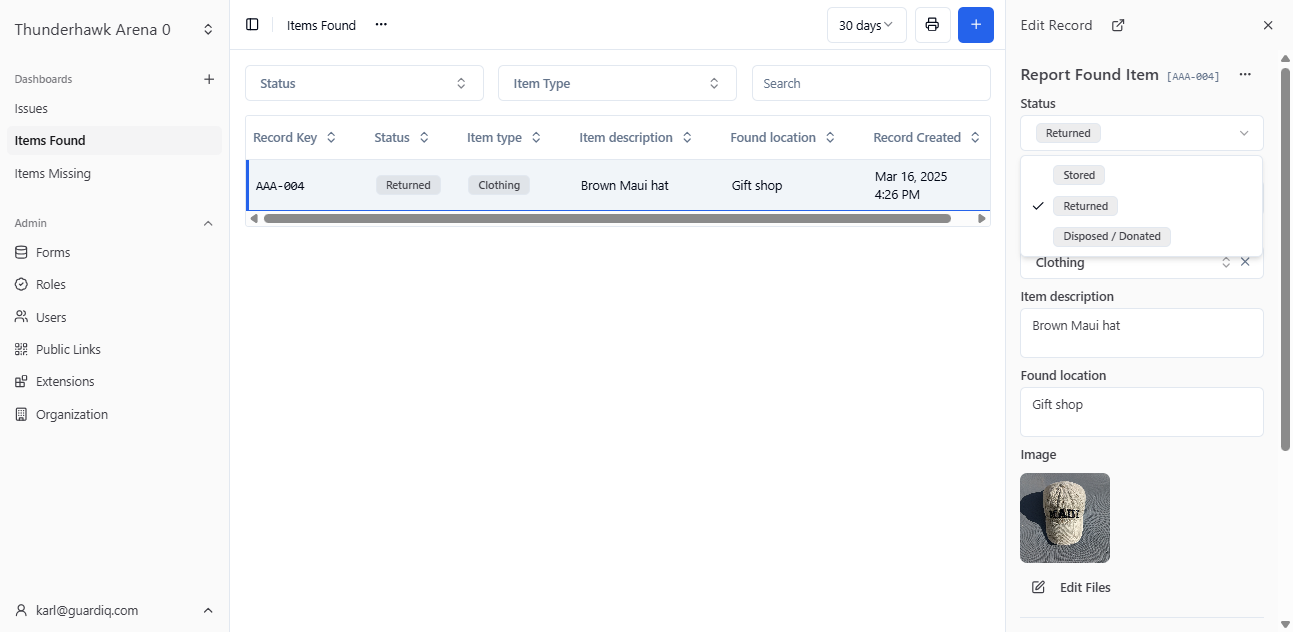
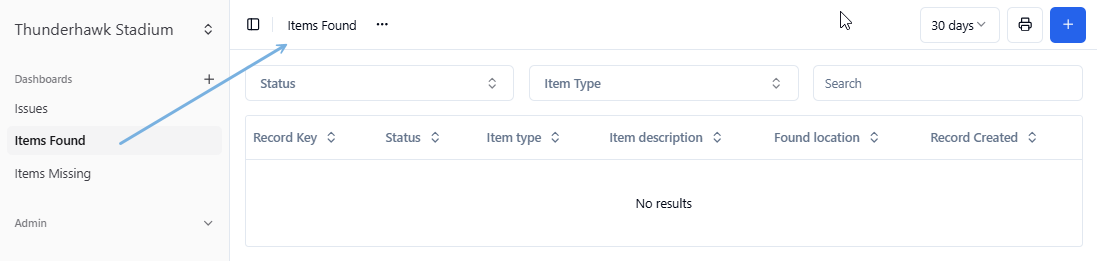
Open your Items Found Dashboard
- Show the item has been Returned, much to the relief of the owner
About Forms and Fields
Forms generate incident Records that will instantly appear in your dynamic Dashboards.
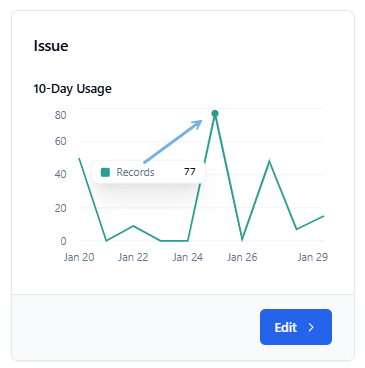
Forms are built with a variety of Fields, as seen in this Event entry Form. Each Field captures unique Values — which can be filtered to refine your Dashboards and Reports.
View your organization's active forms
If you have access to view your organization's forms:
- Click open the Admin menu → and pick Forms
- Scroll down your list → and view the usage statistics
- Tap Edit → to make changes to a Form
- Pick Create Form to add new Forms → using the Field Types that will be described in Lesson 9
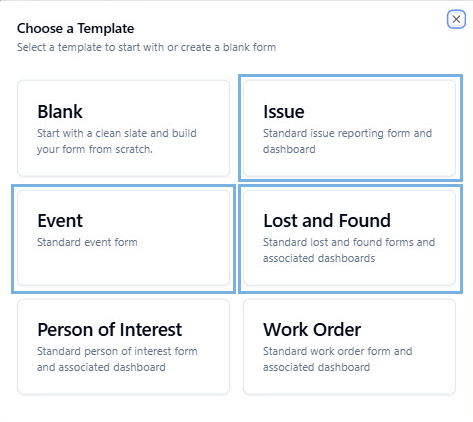
Creating Forms & Dashboards from Templates
Templates provide a 'best-practice' starting points for new Forms and Dashboards.
That said, you can mold and adapt these Forms and Dashboards to your specific needs. (And we'll help, both during the initial setup and thereafter.)
To create a new Form using a Template:
-
Pick Forms
-
Select Create Form

-
Choose a Template → ex. Issue, Event, or Lost and Found
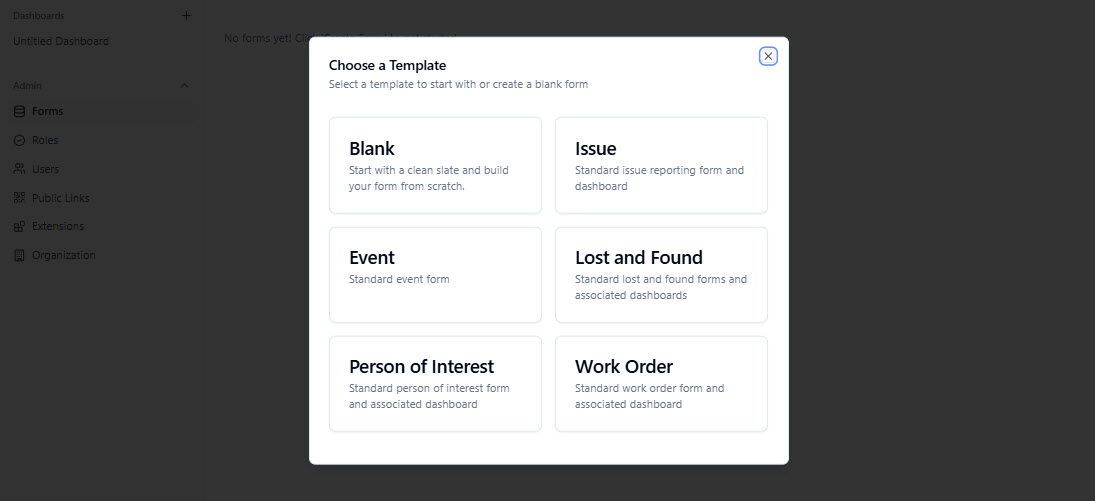
-
Scroll down to the next section for specifics
Common Templates
In this section, we’ll link to instructions on how to create the most commonly used Forms. Some Templates conveniently generate a related Dashboard in one go! Click the links to learn more.
1. Issue Form & Dashboard
Make it easy to enter and record incidents, take action, filter, and track progress within your Dashboards. Use Shortcuts for the most repeated issues → ex. Wet Spills
2. Event Form & Event Controller
Add upcoming events (and filter prior events for analysis). Consider breaking out Shortcut Forms to add Event Markers quickly → ex. Hockey, Basketball, or Concert
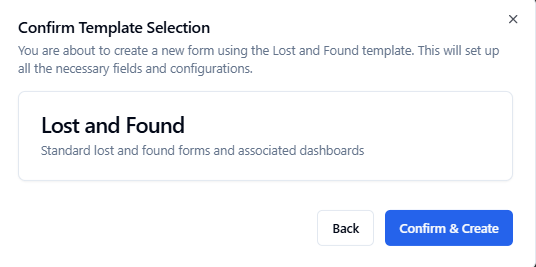
3. Lost and Found Forms & Dashboards
In this Template we split Forms and the related Dashboards into Found Items and Missing Items to facilitate returns
4. Person of Interest Form & Dashboard
Track people of interest, including persons that have presented a risk to themselves or others and may have been suspended from the venue for a period of time
5. Work Order Form & Dashboard
Generate, assign, and track Work Orders → ex. maintenance, repairs, grounds, and event changovers
6. Blank: Create a Patrol Form from scratch
Explore how to create unique forms all your own — from scratch! This is for the truly adventurous. Learn the secrets of Form building here!
1. Issue Form & Dashboard
Typically, Issues/Incidents generate the most Records and actions during typical events. So we'll start here.
The Issue Template will automatically generate a corresponding Dashboard to match! And, you can customize any Form and Dashboards to fit your exacting needs.
To create a new Issue Form:
-
Pick Forms
-
Select Create Form
-
Choose Issue

-
Click Confirm & Create

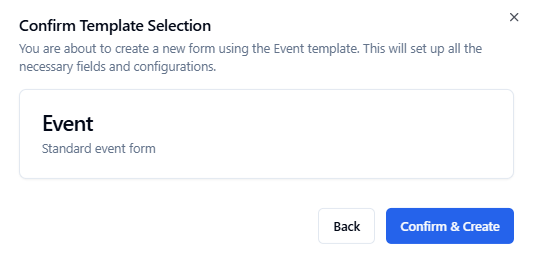
2. Event Form & Event Controller
The Event Form contains an Event Controller, complete with Event Markers to make entering and managing events brilliantly easy. (See Run Your Events to learn more.)
To create a new Event Form:
-
Pick Forms
-
Select Create Form

-
Choose Event

-
Click Confirm & Create
3. Lost & Found Forms & Dashboards
The Lost and Found Template automatically generates two Dashboards — one for Items Missing and the other for Items Found.
The Dashboards can be filtered and compared to aid a swift return of any lost thing.
Create two Lost and Found Forms & Dashboards
To create new Lost & Found Forms (Items Found & Items Missing) and their associated Dashboards:
-
Pick Forms
-
Select Create Form
-
Choose Lost and Found

-
Click Confirm & Create
Add Event Markers
Event Markers are highly recommended. They tie Records to an Event based on the first marker's start time. Markers move events along smoothly and are valuable when filtering Records, Dashboards, & Reports.
To include Event Markers:
-
Add your first marker → typically Setup or Pre-door
-
Optional: Enter a time for the first marker in advance!
- Pick the Calendar → and pick a date and time
- Adjust the times → and set the Hour, Minutes, AM-PM
- Click Done
- Important:
-
If no time has been set → and the Event is starting → click Now as marked with an arrow

-
-
Click + Add Marker to add your 2nd, 3rd markers, and so on → ex. Doors Open, Egress and Doors Closed
-
Click Create to wrap things up
Do you set the time in advance → or as you arrive to the event?-
Tip 1 → Setting the time in advance means you don't need to worry as you arrive to the Event → ex. What if you get there a bit late?
- And, you can change the time later if needed
-
Tip 2 → If you set your first marker in advance, be generous with initial start time → ex. Setup = 12:30 PM for a 5:00 PM start
-
Tip 3 → No need to enter times for the remaining markers! As you Advance markers, the precise time is inserted for you!
-
Tip 4 → If no time has been set → click Now when the Event begins, as marked above in step 5
-
Learn more from our complete guide → Manage Event Markers
-
Key: 1. TGForms-s-MGForms + 2.MGEvent-forms + 3. GMarkers(clip)