Run Events
About the Event Controller
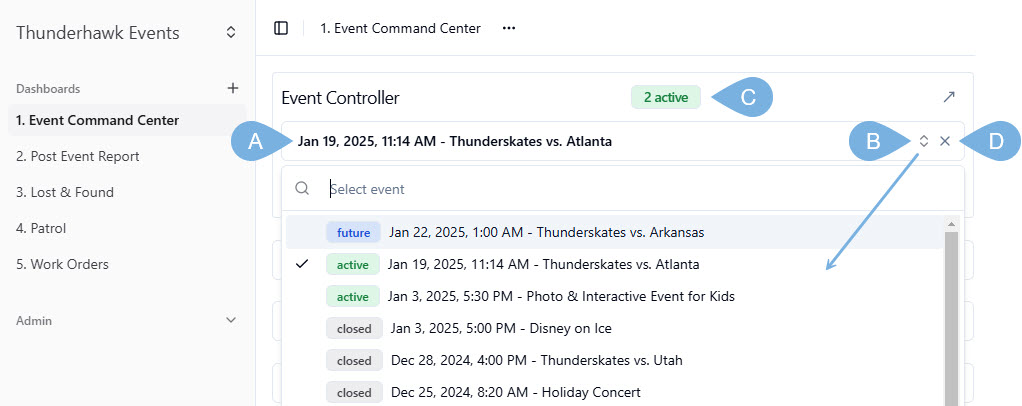
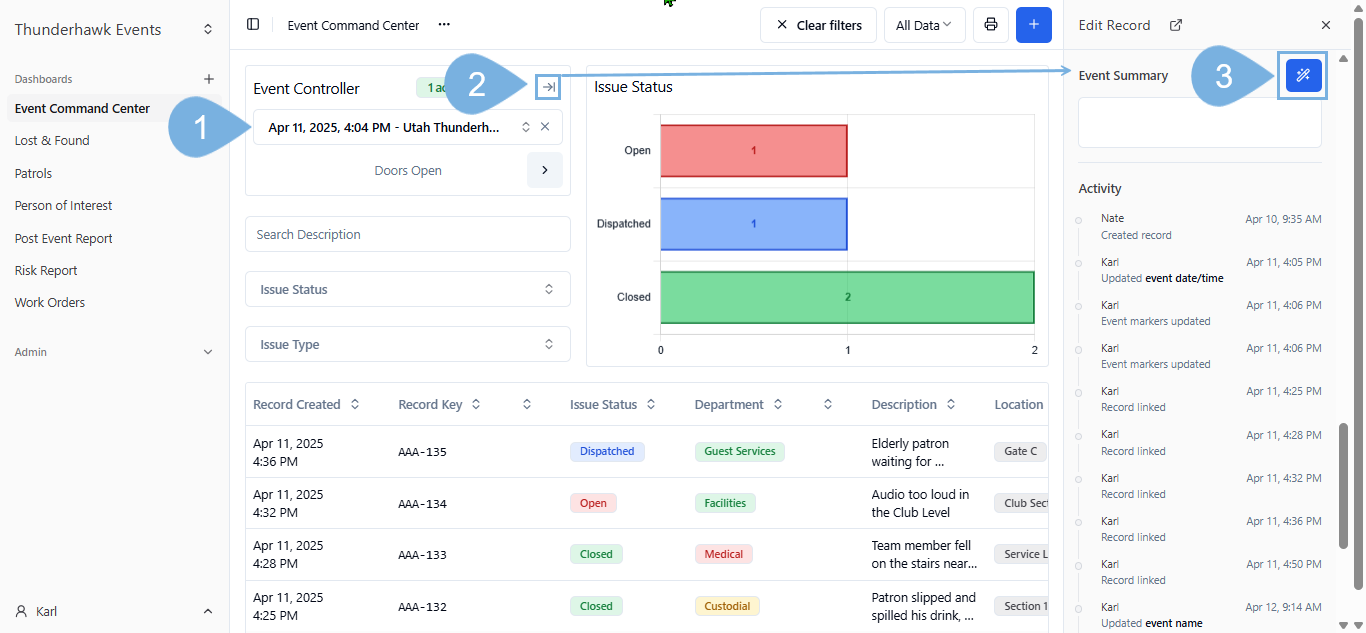
The Event Controller is center stage on Event Command Center (ECC) Dashboards. With a click, you'll select an event (by date) along with its Event Markers.
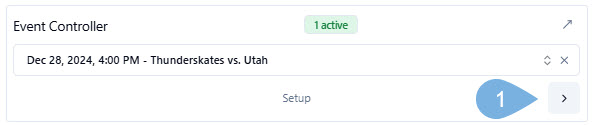
- A. Event Display box
- B. Event Selector drop-down menu
- C. Active Events notification
- D. Click X to clear all events
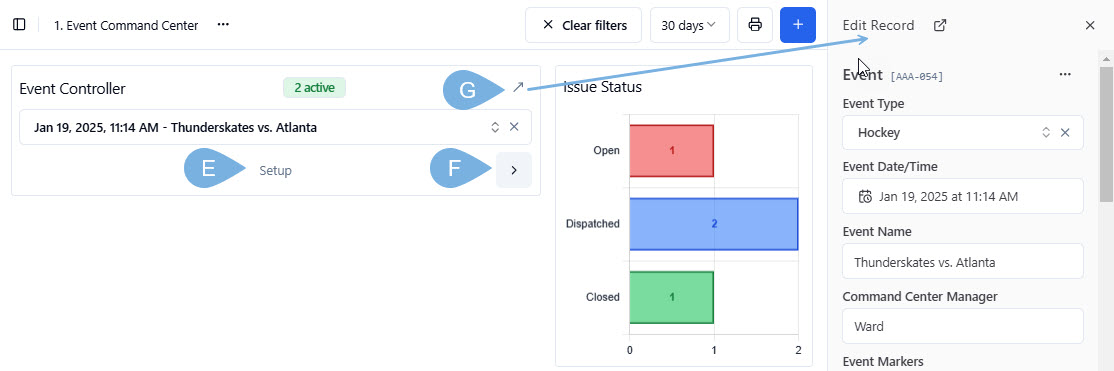
- E. Current Event Marker → Setup
- F. Advance Event Markers icon → Doors Open → 1st Period → Intermission →
- G. Edit Record icon → click to make changes to an Event on the fly
- Does your venue track ongoing operations outside of Events?
- If so, you won't need an Event Controller or Event Markers for those operations
- Examples can include venue Patrols, Inventories, Work Orders, and Lost & Found
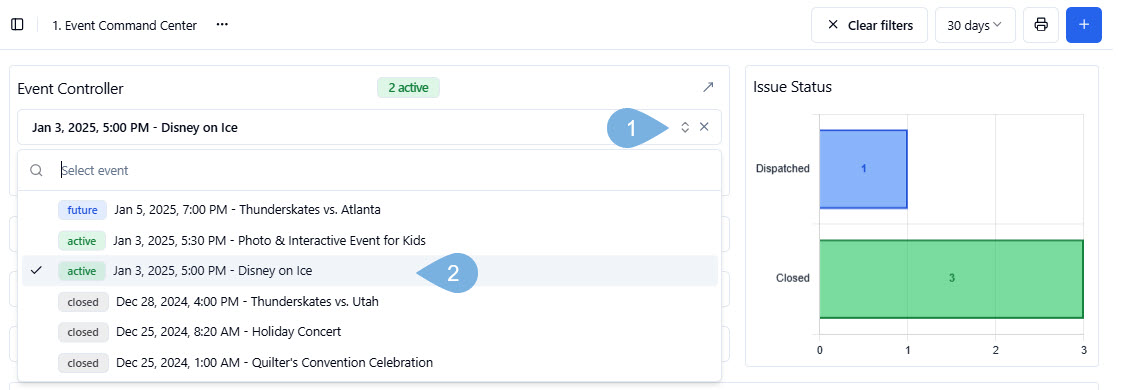
Selecting & Clearing Events
To switch and clear events:
-
Click open your Event Selector menu
-
Pick any event from your list
- The active event is highlighted and displays a checkmark → until you make a switch
- This checkmark is helpful when spotting the currently active event
- The checkmark also helps when switching between events running simultaneously
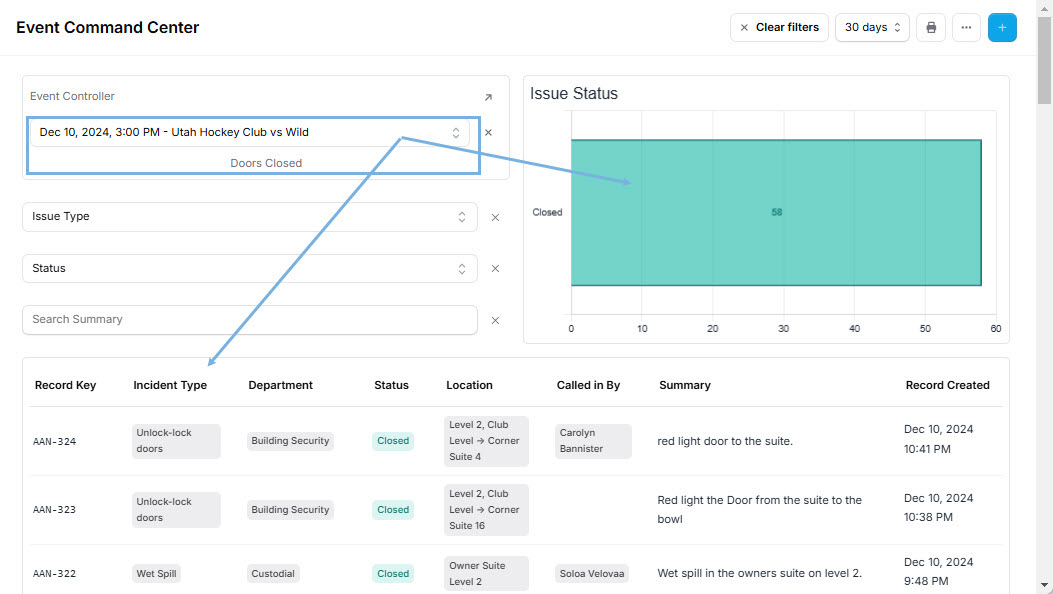
 Filter by Events
- The Event Selector filters Records for selected events → ex. Future, Active, and Closed
- To clear all events from the Event Display window, click X

Adding New Events
To add events to Guard IQ:
-
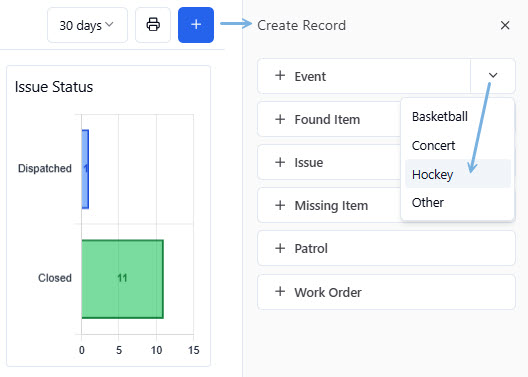
Click the + Blue Create Record icon
-
Select the Event button → or pick one of its Shortcuts from the drop-down ** → ex. Hockey
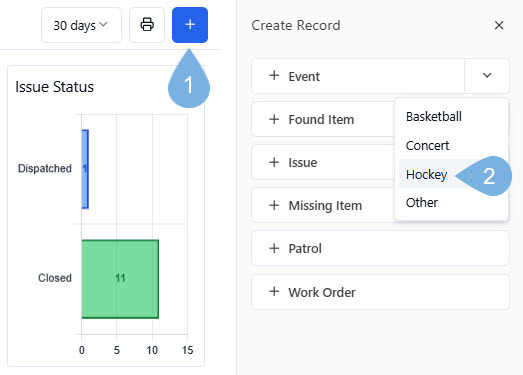 shortcuts
- Shortcuts will speed up your entry of recurring events → ex. Basketball, Hockey, or Concerts
- Visit Make Shortcuts to learn more
-
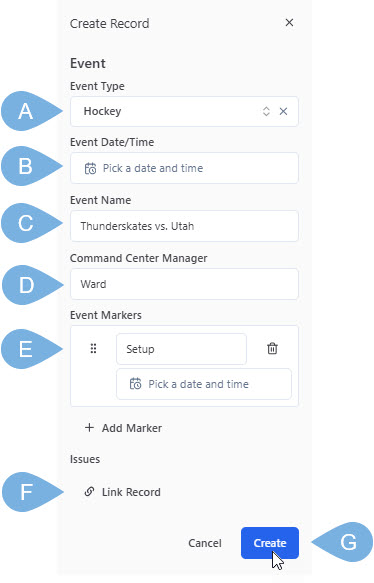
Fill in your Event Form, including your:
A. Event Type → optional
B. Event Date/Time → set by clicking the Calendar icon
C. Event Name
D. Manager's name → optional
E. Event Markers → see Adding Event Markers - Step # 4 below
F. Issues: Linked Record → see Link Records
G. Click Create
Adding Event Markers
Event Markers are highly recommended. They tie Records to an Event based on the first marker's start time. Markers move events along smoothly and are valuable when filtering Records, Dashboards, & Reports.
To include Event Markers:
-
Add your first marker → typically Setup or Pre-door

-
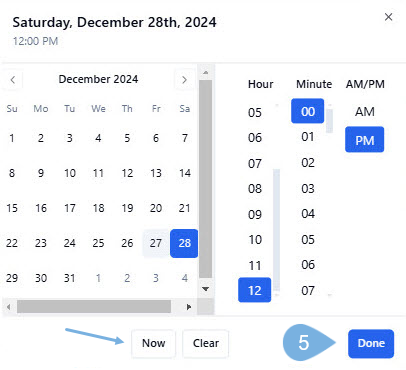
Optional: Enter a time for the first marker in advance!
-
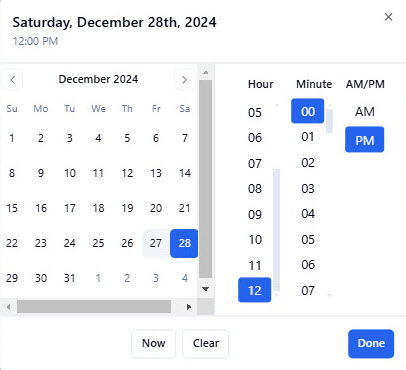
Pick the Calendar button → and pick a date and time
-
Adjust the times → by selecting the Hour, Minutes, AM-PM
-
Click Done
-
Important:
- If no time has been set, and the Event is starting → click Now as marked with an arrow
-
-
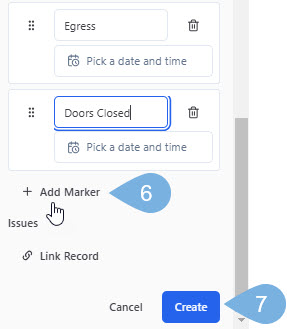
Click + Add Marker to add your 2nd, 3rd markers, and so on → ex. Doors Open, Egress, and Doors Closed
-
Click Create at the bottom of your form to wrap things up
-
Tip 1 → Setting the time in advance means you don't need to worry as you arrive to the Event → ex. What if you get there a bit late?
- And, you can change the time later if needed
-
Tip 2 → If you set your first marker in advance, be generous with initial start time → ex. Setup = 12:30 PM for a 5:00 PM start
-
Tip 3 → No need to enter times for the remaining markers! As you Advance markers, the precise time is inserted for you!
-
Tip 4 → If no time has been set → click Now when the Event begins, as marked above in step 5
-
Learn more from our complete guide → Manage Event Markers
- As you Advance through ALL of your Event Markers:
- The Event will end and be "Closed" in Guard IQ
- All of the Event Markers will have their Date/Time stamps completed
- All the Issues tracked from the start will be Linked to the completed Event
- And if you forget, you can always go back and change the times as needed
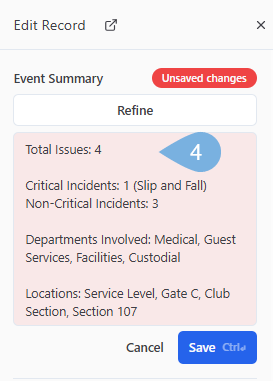
NEW → Summarize an Event with AI
To generate and refine a summary of your event:
-
Select an Event from your Event Controller
-
Click the open the Event's Record
-
Find your Summary Field → and click its AI icon
-
Blink as your event's Records are summarized
-
Improve and focus your summary by adding or excluding information → ex. "Leave out the Medical issues" → then click Refine
-
Continue refining until you are satisfied → then click Save

-
Copy and paste your summary from it's window → then place it anywhere you like

- The name of the Event Summary Field can vary
- However, it must be a Multiline Text Field
- And, the Form must have have one or more Linked Records attached
- If you have questions, ask your Guard IQ Admin for help setting up your AI Summaries

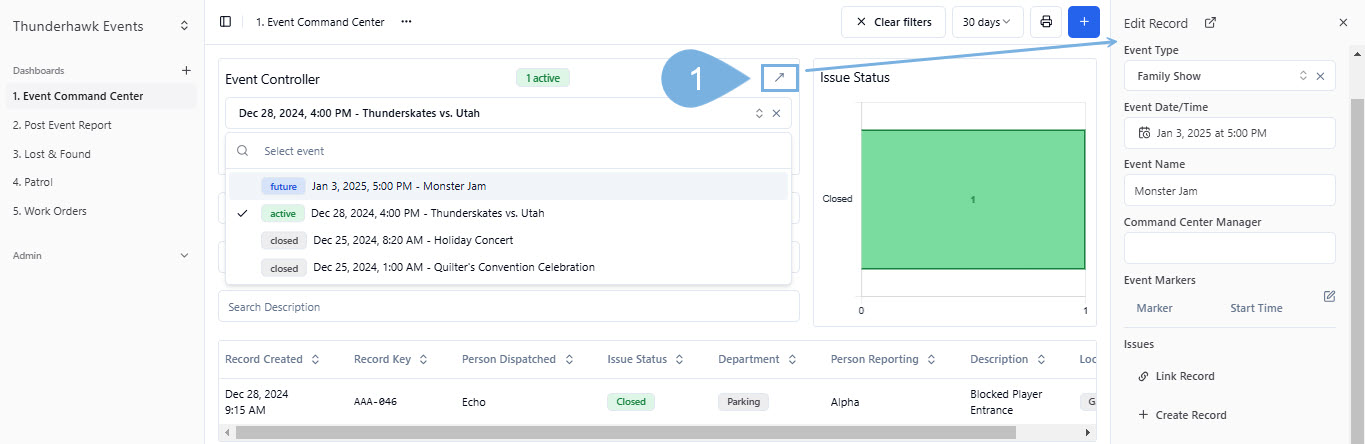
Changing & Editing Events in the Event Controller
Clicking the Event Controller's Expand icon lets update your Event on the fly!
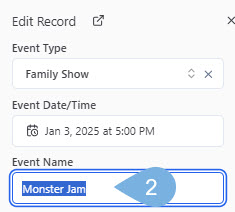
- Say you need to change the name of an event from Monster Jam to Disney on Ice – and even change the date. (Hey, mistakes happen!)
-
Click your Event Controller's Expand icon as indicated above
-
Highlight the Event Name
-
Change the name → and press Save

Simple as that!
-
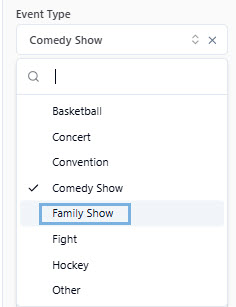
If you have an inaccurate Event Type field, switch that out too
-
You can also change the Date/Time by clicking its Calendar icon → and selecting a new date and time from the Calendar → and clicking Done
-
Warning: If you change the start Date/Time → don't forget to reset the dates and times for your Event Markers by clicking their Calendar icons too

Advancing Event Markers During Events
When your event enters the next stage, advance your markers:
-
Simply click the Event Marker's Advance icon
-
Move to the next phase by clicking Continue

Background Reading
What follows is a brief overview of what goes on underneath the hood in Guard IQ.
Your venue's Forms and Dashboards are likely already configured. That said, the following can inform your requests for changes and customizations. You can also make changes on your own depending on the permissions checked in your User's Role profile.
About Creating a New Event Entry Form
For instructions on how to create an Event entry Form from our Event Template, read:
About Adding the Event Controller to Dashboards
To add an Event Contoller Widget to a typical Event Command Center dashboard:
-
Start by clicking the + Create Dashboard icon

-
Select the Ellipses
-
Pick Edit Dashboard

-
Name your Untitled Dashboard → ex. Event Command Center (ECC)
-
Click + Add Widget

-
Either drag the Event Controller Widget to the Dashboard → or click the Quick Add icon
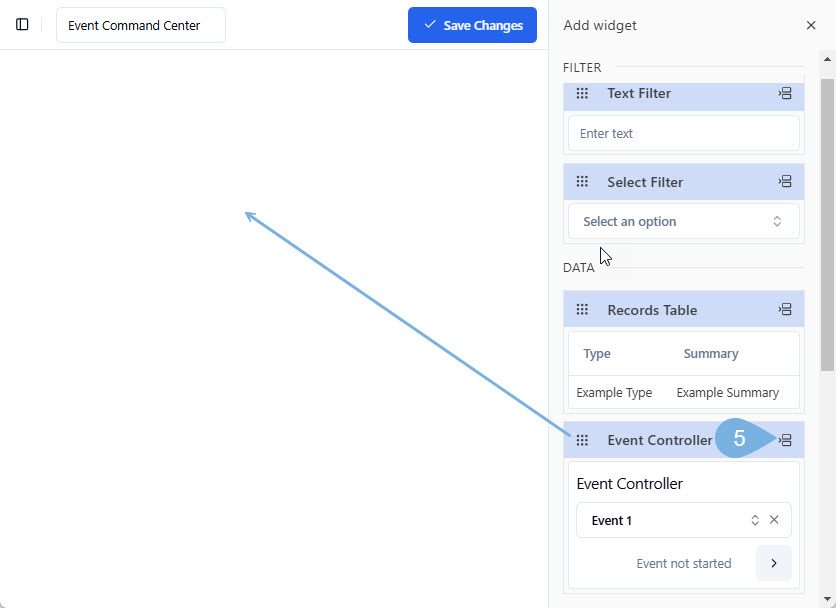
-
Size and position your new Widget
-
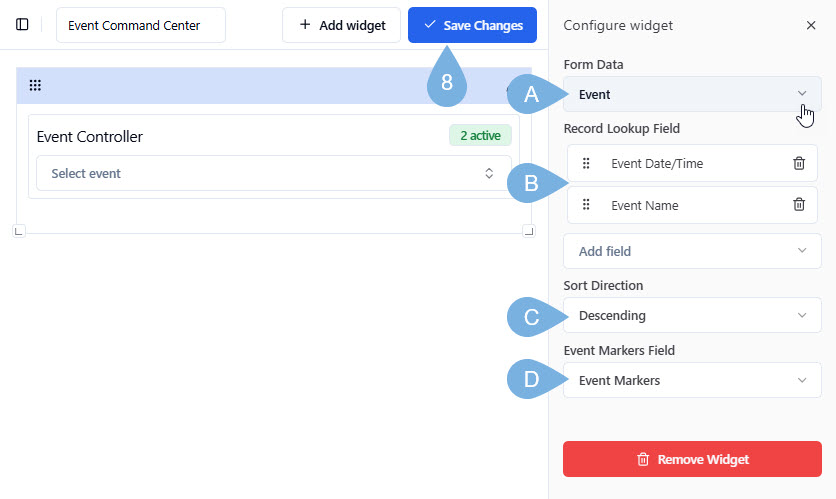
Configure the new Event Controller by selecting the following → and then click Save Changes
A. Form Data → pick Event
B. Record Lookup → pick Event Date/Time followed by Event Name
C. Sort Direction → choose Descending or Acending
D. Event Markers Field → select Event Markers
 All About Dashboards
- To learn more, visit our comprehensive guide Design Dashboards
About Creating Event Entry Shortcuts
Shortcuts streamline data entry by pre-filling subforms with targeted information. For example, create distinct "Basketball," "Hockey," and "Concert" event shortcuts from the parent "Event" form.
An added benefit; each pre-configured shortcut will already have its relevant Event Markers entered in! This dramatically expedites the creation of recurring event types.
For instructions, read the Create Shortcuts guide in this Help Center.
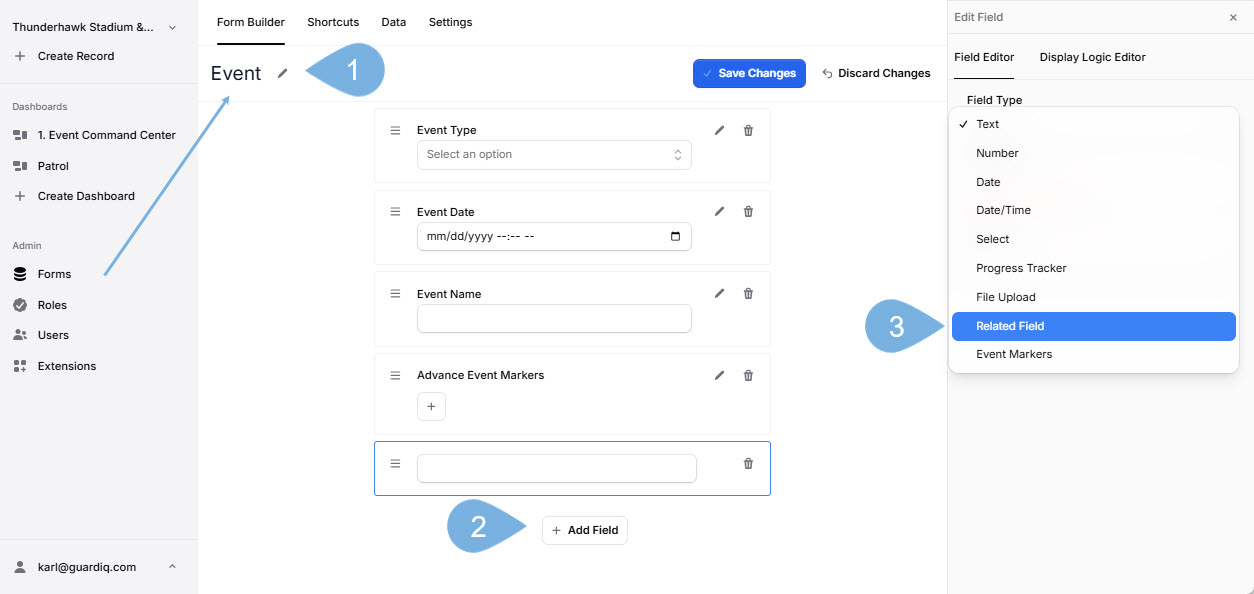
About Related Fields
Related Fields establish the connections between records generated by different forms. For instance, an "Events" form can link a specific event (ex. "Tonight's Hockey Game") to related "Issues" records (ex. "Wet Spills" recorded during the game).
This enables efficient data analysis and Dashboard reporting across different event-related data points.
- Related Fields must be set in both the sending and receiving Forms (ex. Issues ← → Events)
- Set Related Fields at the start, then forget about them
- Related Fields will allow you to filter "Issues" for a single hockey game vs. "Issues" for all games
Linking Related Fields between "Events" ← → "Issues" Forms
In our example, we'll need to include the Related Fields element in both our Events and Issues forms so they can link records to each other.
- Create both your Events and Issues forms first (at least in a draft form)
- It doesn't matter which form you link first or second
- See Create Forms to learn more all the forms you may want to use at your venue
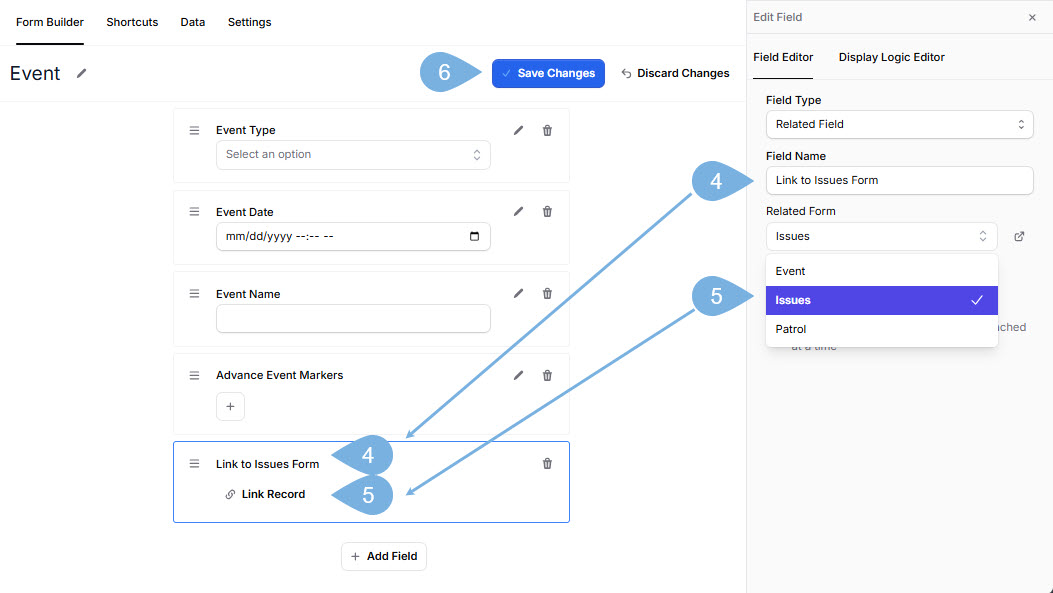
Link Events → Issues
To link Events to Issues:
-
Open your target form → ex. Event
-
Click + Add Field
-
Select Related Field as your Field Type
-
Enter the Field Name → ex. "Link to the Issues Form"
-
Pick your Related Field → ex. "Issues"
-
Click Save Changes
Link Issues → Events
To link your Issues to associated Events:
-
Open your target form → ex. Issues
-
Click + Add Field
-
Select Related Field as your Field Type
-
Enter the Field Name → ex. "Link to the Events Form"
-
Pick your Related Field → ex. "Events"
-
Click Save Changes