Walk 6 → Link Records & Risk Reports
Introduction
Don't enter an incident twice! For example, save time by linking risky related indidents to your Risk Reports.
Use case: Thunderhawk Risk Reports
-
Thunderhawk mandates post-event Risk Reports for legal, security, and post-incident evaluation purposes. The Risk Dashboard must display each risky incident in three categories — Medical, Lost Person, and Security.
-
To populate the nightly report, Risk Records must be created
-
Rather than re-enter dozens of incidents into Risk Records, Thunderhawk simply links their related Issues
-
And, it's so easy to do
-
You can link records on both Mobile devices and your Event Computers. If you can, try these techniques on both platforms.
- Catch up on the latest Walk 6 article →
- If you need to practice
- Work through the 'Try it!' checklists in your Sandbox (Thunderhawk Arena)
Try it!
→ on Event Computers
A. Start by reading → About Linking Records, Dashboards & Reports (4 min)
B. Then attempt this Hands-on Checklist
Hands-on Checklist
Create a Medical Issue
-
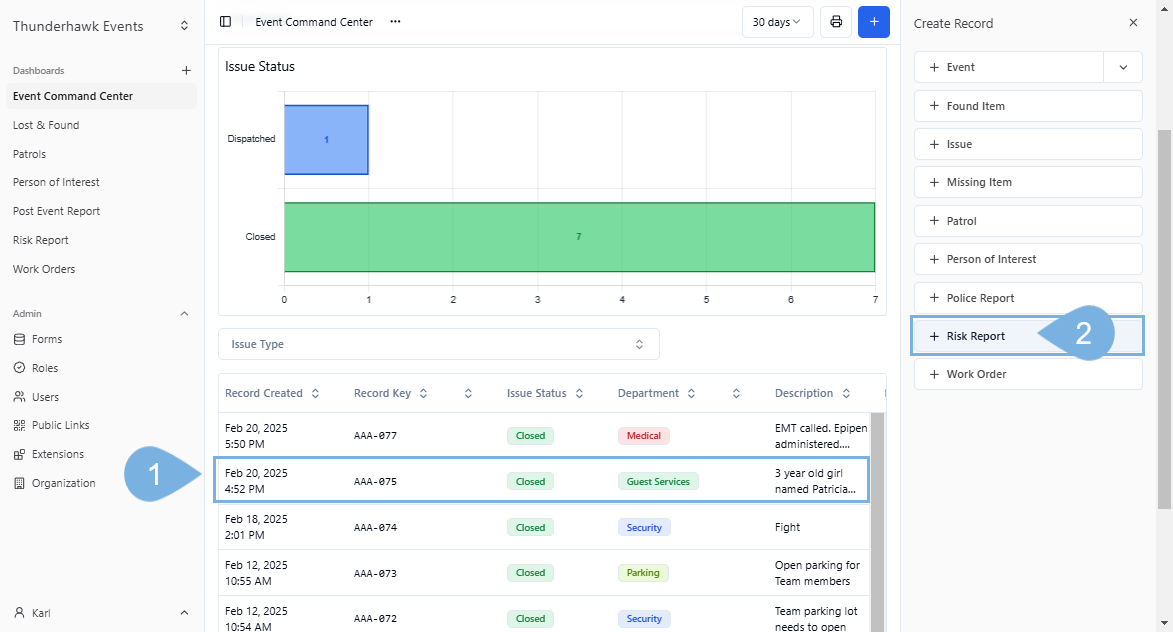
Open Thunderhawk Events and the Event Command Center Dashboard → Hint✋
-
Click +Create and pick the Issue Form → Steps ▶
-
Add a Medical Issue → Steps ▶
- Pick your Event → ex. Magic vs. Stars
- Issue → Courtside Accident
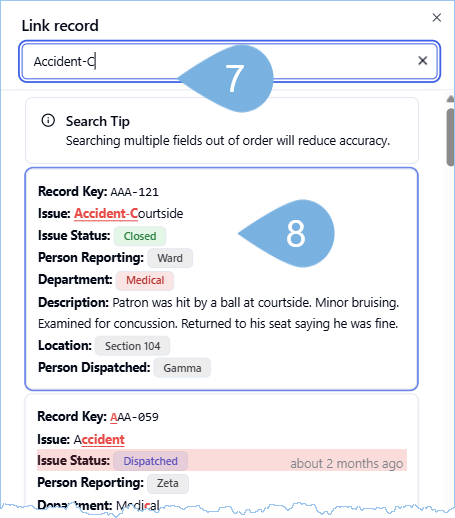
- Hint: Use Quick Search to locate the Courtside Accident quickly → in one letter (Acc) → Hint✋
- Issue Status → Closed
- Person Reporting → Ward
- Department → Medical
- Description → Patron was hit by a ball at courtside. Minor bruising. Examined for concussion. Returned to his seat saying he was fine.
- Location → ex. Section 104
- Person Dispatched → ex. Gamma
- Click Create
Create a Risk Record & Link the above Issue

-
Pick:
- Risk Type → Medical
- Was the person injured → Yes
- Injury Description → Skip → it's in the Issue record
- What medical attention was provided? → Skip → it's in the Issue record
- Click Link Record

- Search for the Record you created above → ex. Accident-Courtside
- Click this Issue Record → to pass it to your Risk Record
-
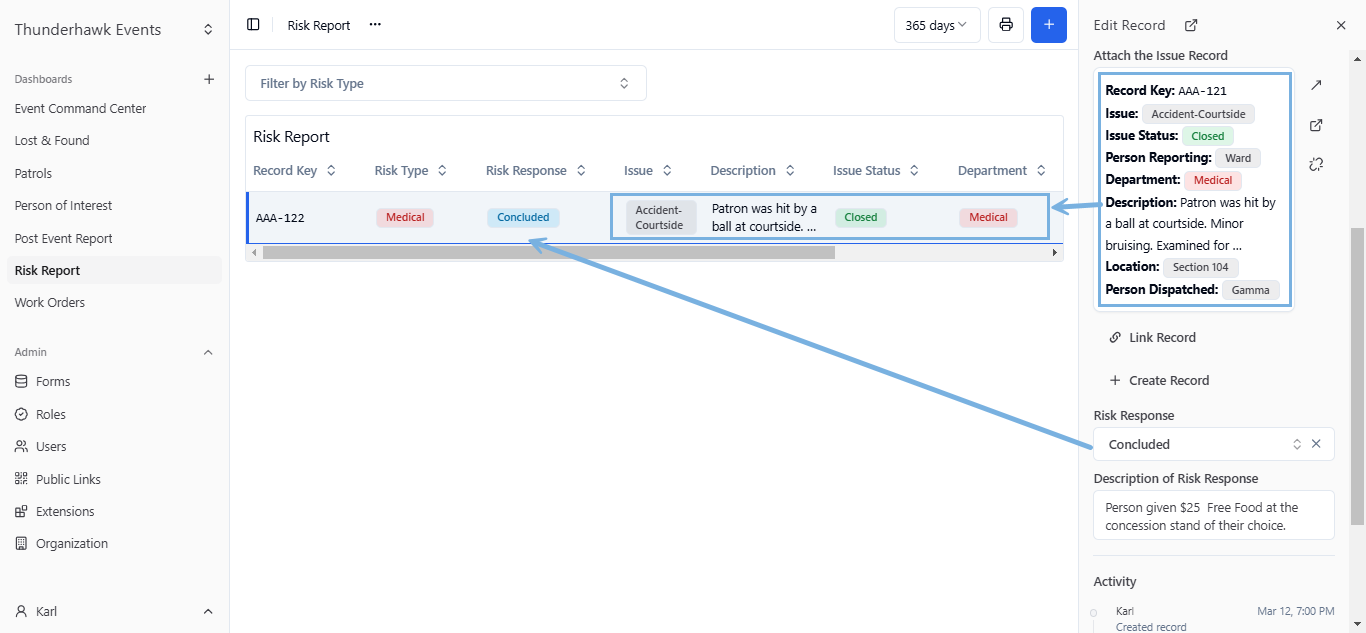
Click Create
- A. Notice the Risk Report:Link Record field added to the Issue Form
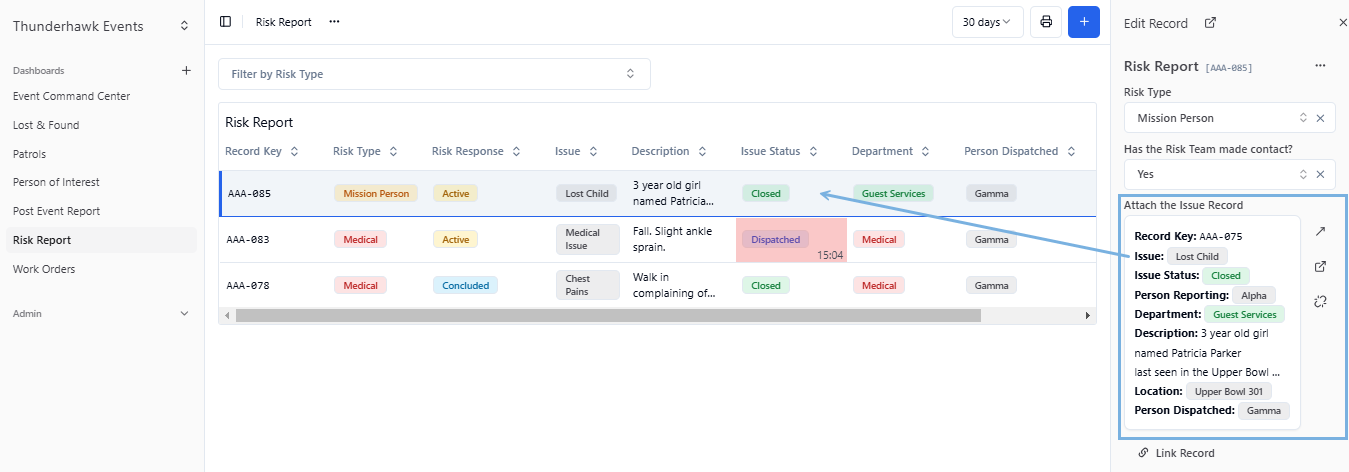
- B. Notice that four fields updated from the linked Issue Record
- C. Notice that Three fields are completed from the Risk Report Form
Download a PDF Report
- Download your PDF Risk report
- Open and inspect your PDF Risk Report
→ on Mobile Devices
A. Start by reading → Lesson 8: Event Computer Techniques (4 min) (This is a repeat of the Event Computer version of this skill.)
B. Then try this Hands-on Checklist
Hands-on Checklist
Create a Lost Persons Issue
-
Click +Create and pick the Issue Form → Steps ▶
-
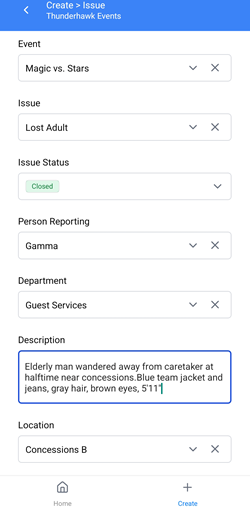
Add a Lost Adult Issue → Steps ▶
- Pick your Event → ex. Magic vs. Stars
- Issue → Lost Adult
- Hint: Use Quick Search to locate the Lost Adult option quickly → in a few letters (Los) → Hint✋
- Issue Status → Closed
- Person Reporting → Gamma
- Department → Guest Services
- Description → Elderly man wandered away fro caretaker at halftime near concessions. Blue team jacket and jeans. Grey hair, brown eyes, 5'11"
- Location → ex. Concessions B
- Person Dispatched → ex. Xeno
- Click Create
- Open your Event Command Center Dashboard → and view your new Lost Adult Record → Hint✋
Create a Risk Record & Link the above Issue
-
Click + Create and choose a Risk Report Form → Steps ▶
-
Pick:
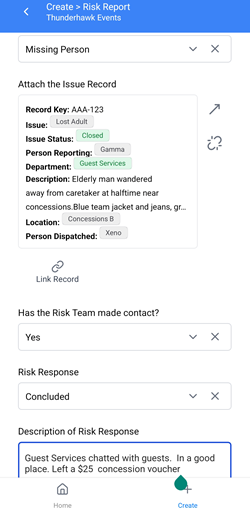
- Risk Type → Missing Person
- Click Link Record →
- Search for and click on the Record you created above → ex. Lost Adult)
- Has the Risk Team made contact → Yes
- Risk Response → Concluded
- Description of Risk Response → Guest Services chatted with guests. In a good place.$25 concession voucher
- Click Create
-
Open your Risk Report Dashboard → Hint✋
- Scroll through and notice the Risk Report:Link Record fields added to the Risk Form
→ in your Home Organization
- If your Home Organization has a Risk Report, give it a look!
- Ask around to learn how Linked Records are used in your Home Org
Event Computer Techniques
About Linking Records, Dashboards & Reports
Clicking Link Record will merge data from separate Records.
In this example, we'll attach Issue Records to a nightly, customized Risk Report.
At one go, the merged Issue data will flood into the targeted Risk Form → Risk Dashboard → and Risk Report.
Follow along as we:
-
Click Link Record in a Form
-
Click to Attach the Record you wish to link
-
Watch the data from the attached Issue flood in → and fills in the targeted Form and Dashboard (Risk Report in our example)

- Read our Use Case about a missing child. (It's riveting stuff!)
- Continue on to The Details for a more complete step-by-step
- Learn to create, rename, and edit your own linked records in our expanded Link Records Guide
Use case
Linking a Found Child to a Risk Report
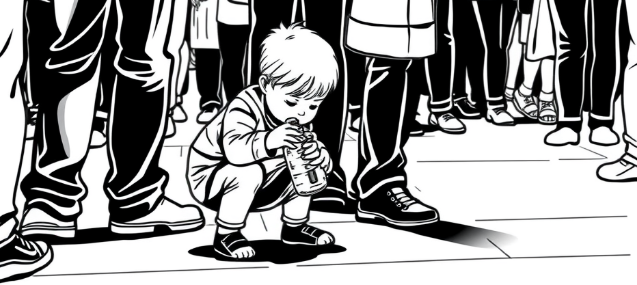
A child drops their adorably cute unicorn water bottle at a game. With her parents glancing away, for barely a second, the child wanders into a crowd in search of their precious keepsake.
-
Every parent's nightmare — every venue's top concern
-
Immediately, a Lost Child incident pops into Guard IQ
- Alerts are sent and the arena's cameras and crews start searching with urgency
- A push notification is also sent to staff in the Guard IQ Mobile app
-
The anxious moments are tracked in an Issue Form and related Dashboards

-
- At Thunderhawk Events:
- Every Lost Persons Issue is linked over to the Risk Team
- The Risk Team will follow up and tracks the Issue to its conclusion
- Finally, a complete record is always linked into their nightly Risk Report
The Details
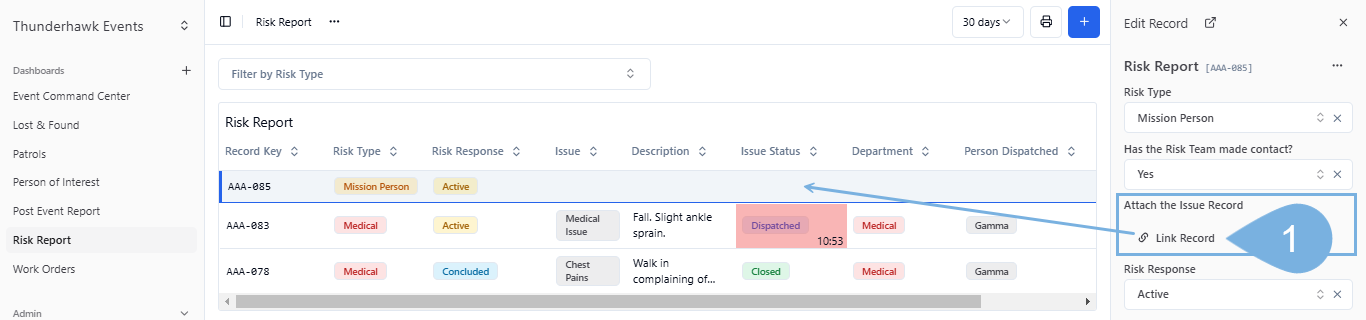
How to Link Issues to a Risk Report
-
A Lost Child issue has been create in an Issue Form
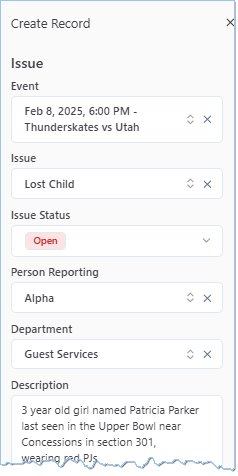
→ Notice the Risk Report:Link Record field added to the Issue Form

-
Open another Form → ex. such as a Risk Report Form
-
Complete the Form
-
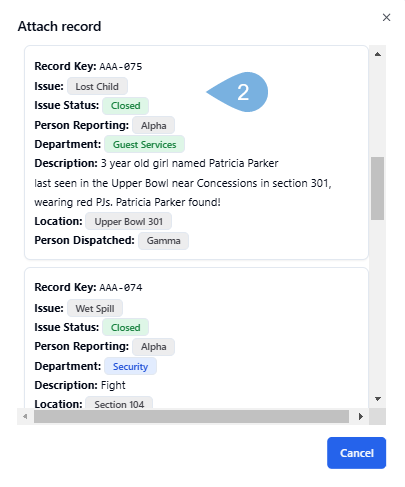
Click Link Record → ex. named here as "Attach the Issue Record"
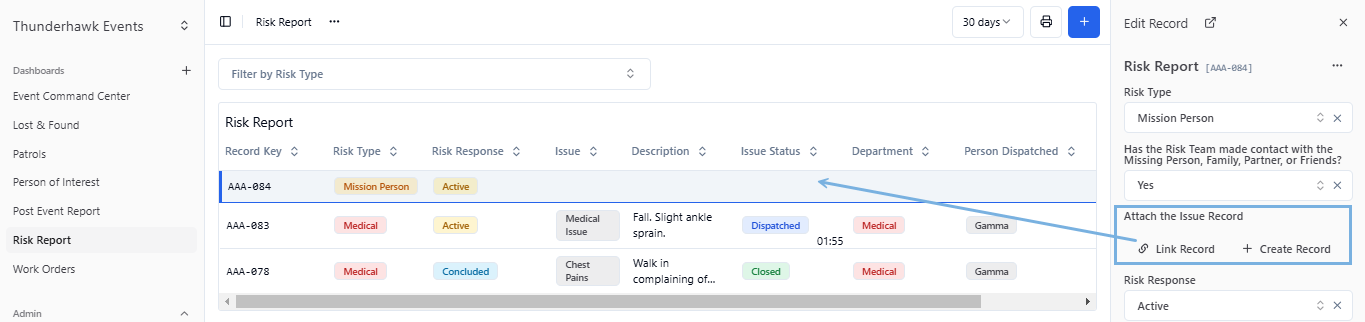
-
Select the Lost Child Issue → which will pull the data into the Risk Form
- You can even attach multiple records

-
Watch the data from the attached Issue flood in → and fill in the Risk Report Dashboard!
Add a Related Field to a Form
If you have the proper permissions in your Role description, you can add and rename Link Record fields to any Form.
-
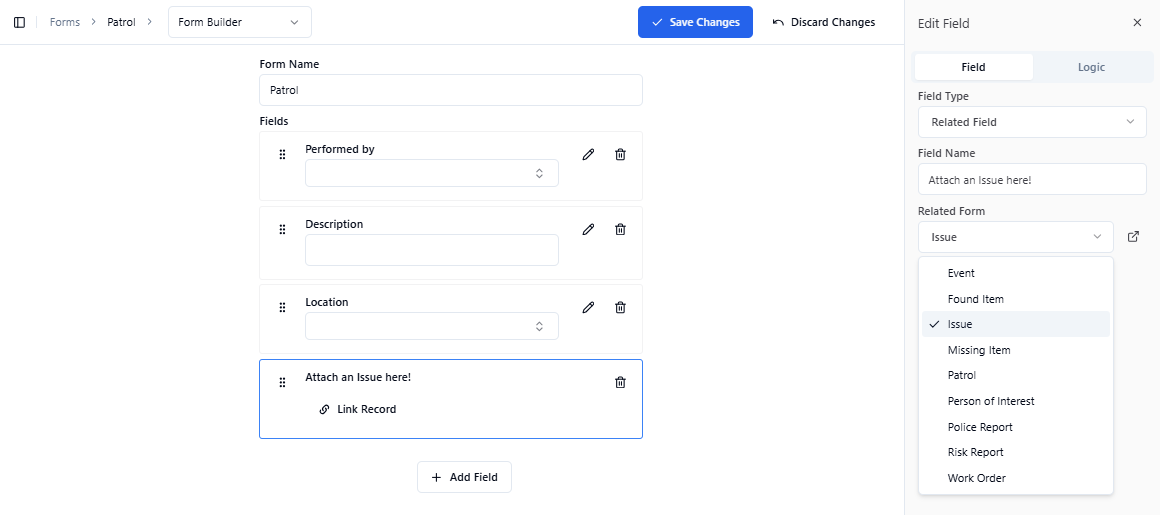
Click + Add Field in the Form builder
-
Select Related Field from the drop-down

-
Name the Field something discriptive ex. Add an Issue here!
-
Select a dataset to pull from, ex. Issue Records
End of Reading