Walk 3 → Add Events & Incidents
Introduction
In this lesson you'll:
- Add and Edit an Event with an Event Form's Shortcut
- Create Records in an Issue Form
- Update Records from your Dashboard
- Catch up on the latest with our Walk 3 readings →
- If you need to practice
- Work through the 'Try it!' checklists in your Sandbox (Thunderhawk Arena)
Try it!
→ on Mobile Devices
- Note: If you don't have access to the Mobile App, jump to the Event Computers section
A. Start by reading → Walk 3 Add & Update Records in Mobile (5 min)
B. Then return here and try this Hands-on Checklist
- Note: If you don't have the Mobile App, complete the below Checklist on your Event Computer
Hands-on Checklist
Create an Event
-
Open the Guard IQ App and the Thunderhawk Events org → Hint✋
-
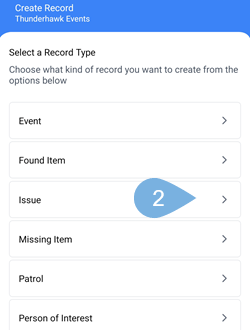
Click + Create → Steps ▶
-
Select the Event form Steps ▶
-
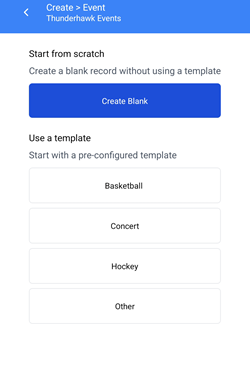
Pick Basketball from the pre-defined Shortcut list → Steps ▶
-
Start the game at this very minute by entering the following → Steps ▶
- Event Date/Time = Pick the current date and time
- Event Name = Invent your team names
- Put yourself in as the Command Center Manager
- Click Create
-
Click Home to go to your Event Command Center Dashboard and select YOUR game (from step 5) → Hint✋
- The Dashboard will likely be blank
-
Big oops. Update your Basketball Game by changing the name of your visiting team for the event → Steps ▶
- Also, update the start time by 30 minutes
Create Three Records
-
Click +Create to add a new Record → Steps ▶
-
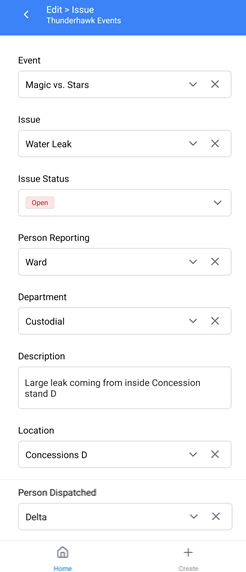
Create a Water Leak Record at your game with the Issue Form → Steps ▶
- Pick your Event → ex. Magic vs. Stars
- Issue → ex. Water Leak
- Hint: Use Quick Search to locate the Water Leak quickly → in two letters (W L) → Hint✋
- Issue Status → ex. Open
- Person Reporting → ex. Ward
- Department → ex. Custodial
- Description → ex. Large leak from inside Concession stand D
- Location → ex. Concessions D
- Person Dispatched → ex. Delta
- Click Create
-
Create a Wheelchair incident in the Issue Form → Steps ▶
- Pick your Event → ex. Orlando vs. Stars
- Issue → ex. Wheelchair
- Hint: Use Quick Search to locate the Wheelchair quickly → in two letters (Wc) → Hint✋
- Issue Status → ex. Open
- Person Reporting → ex. Ward
- Department → ex. Guest Services
- Description → ex. 75-year old women needs help getting to her seat
- Location → ex. Gate A
- Person Dispatched → ex. Alpha
- Click Create
-
Add a Medical Issue → Steps ▶
- Pick your Event → ex. Orlando vs. Stars
- Issue → ex. Medical
- Hint: Use Quick Search to locate the Medical quickly → in one letter (M) → Hint✋
- Issue Status → ex. Open
- Person Reporting → ex. Ward
- Department → ex. Medical
- Description → ex. An employee, Tango, sliped and fell
- Location → ex. Section 104
- Person Dispatched → ex. Gamma
- Click Create
-
Open your Event Command Center Dashboard and pick your event → Hint✋
- You should see your three Open Records
- If you don't, did you hit Create each time?
- Troubleshooting tip: Did you pick your Event each time? If not, clear (x) your Event Controller, find your records in the Records Table, click them open and make that correction → Hint✋
-
Dispatch cleanup for your Water Leak from #2 above → Steps ▶
-
Dispatch your Medical incident to your EMTs → Hint✋
-
Close the Wheel Chair record → Hint✋
-
Close your Water Leak issue → Hint✋
-
Close your Medical incident with a note that it resulted in a minor sprain to the left wrist. Medical attention was given. Tango returned to work → Hint✋
→ on Event Computers
- Note: You can complete this section on your Mobile Device if you wish
A. Start by reading → Walk 3 Event Computer Techniques (4 min)
B. Then complete this Hands-on Checklist
Hands-on Checklist
Create an Event
- To get started on the Checklist, open Thunderhawk Events and the Event Command Center Dashboard:
- Add a new Event, a Hockey game, using a pre-defined Shortcut → Steps ▶
- Start the game at this very minute!
- Invent your team names
- Put yourself in as the Command Center Manager
- It's go time!
Add three Records
-
Go to you Event Center Dashboard and select YOUR game from step 1 above
-
Create a Wet Spill Record at your game with the Issue Form. It's a drink and popcorn spill on the concourse level near Concessions C → Steps ▶
- Pick your Event → ex. Magic vs. Stars
- Issue → ex. Water Leak
- Hint: Use Quick Search to locate the Wet Spill quickly → in two letters (We) → Hint✋
- Issue Status → ex. Open
- Person Reporting → ex. Ward
- Department → ex. Custodial
- Description → ex. Large Wet Spill
- Location → ex. Section 104
- Hint: Use Quick Search to locate the Section 207 quickly → in three characters (S 1 4) → Hint✋
- Person Dispatched → ex. Delta
- Click Create
-
Create a Lost Child incident in the Issue Form → Steps ▶
- Pick your Event → ex. Magic vs. Stars
- Issue → ex. lost Child
- Hint: Use Quick Search to locate the Lost Child quickly → in two letters (L C) → Hint✋
- Issue Status → ex. Open
- Person Reporting → ex. Ward
- Department → ex. Guest Services
- Description → ex. 5-year old boy with blue thunderhawk shirt and hat
- Location → ex. Last seen in Section 207
- Hint: Use Quick Search to locate the Section 207 quickly → in three characters (S 2 7) → Hint✋
- Person Dispatched → ex. Alpha
- Click Create
-
Add a Medical Issue → Steps ▶
- Pick your Event → ex. Magic vs. Stars
- Issue → ex. Chest Pains
- Hint: Use Quick Search to locate the Medical quickly → with one letters (M) → Hint✋
- Issue Status → ex. Open
- Person Reporting → ex. Ward
- Department → ex. Guest Services
- Description → ex. Mr. Xeno is a walk in complaining of Chest Pains
- Location → ex. NA
- Person Dispatched → ex. Gamma
- Click Create
-
Open your Event Command Center Dashboard and pick your event → Hint✋
- You should see 3 Open Records
- If you don't, did you hit Create each time you created your Records?
- Did you pick your Event each time? If not, clear (x) your Event Controller, find your records in the Records Table, click them open and make the correction by adding in the Event Name → Hint✋
-
Dispatch cleanup for your Wet spill from #2 above → Steps ▶
-
Dispatch your Medical incident to your EMTs → Hint✋
-
Congrats Xeno! Xeno, an Event Staff Team Member, found the lost child, Javier, near Concession D → Steps ▶
- Close the Lost Child incident
- Update with a note about Xeno and Javier in the details
-
Big Ooops. Update your Hockey Game by changing the name of your visiting team for your event → Hint✋
-
Close your Wet spill → Hint✋
-
Close your Medical incident with a note that an ambulance was called and that Mr Xeno is heading to the hospital C → Hint✋
→ in your Home Organization
If you have access to you Home Organization:
-
Open your Dashboards during an event and track the action
-
If you are working events, you'll probably be creating Records already → Hint✋
-
If you do the Thunderhawk simulation below, you may pick up a few new techniques ... who knows!
-
Note: About Event Markers:
-
Event Markers break down an event by logical time periods → ex. Setup, Doors Open, 1st Half, Halftime, 2nd Half, Egress, Doors Closed
-
Simply click the Forward Arrow to move to the next Event Marker

-
Event Markers are covered in detail in Lesson 8, however →
-
→ If your venue already uses Event Markers to move events along, and you need to learn about them now, check out Adding Events and Markers
-
Event Computer Techniques
Add Events
-
Click the + Blue Create Record icon
-
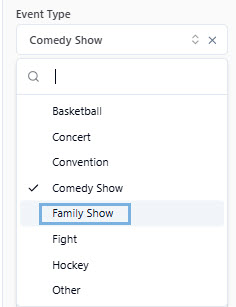
Select the + Event button or a Shortcut from the drop-down → ex. Hockey
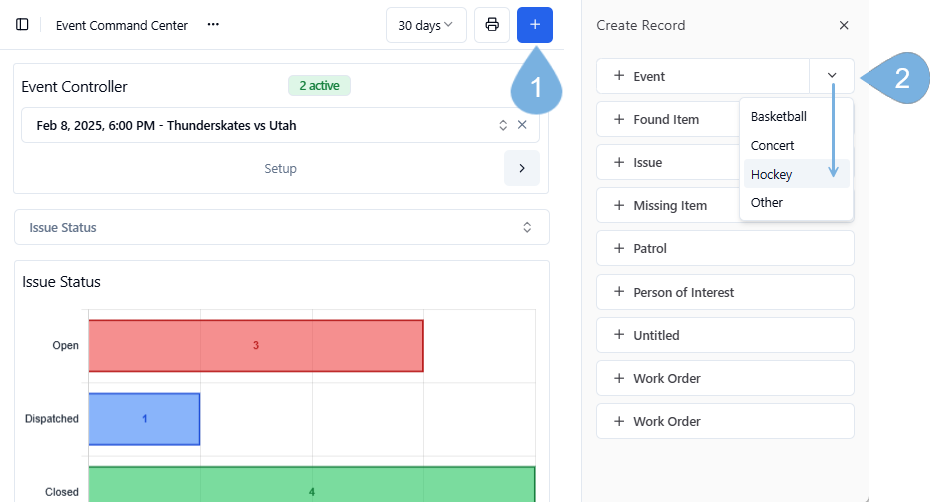 shortcuts
- Shortcuts speed up the creation of recurring events
- Such as → Basketball, Concert, Hockey, or Other events
- Visit the Make Shortcuts guide to learn more
-
Fill in your Event Form → and click Create
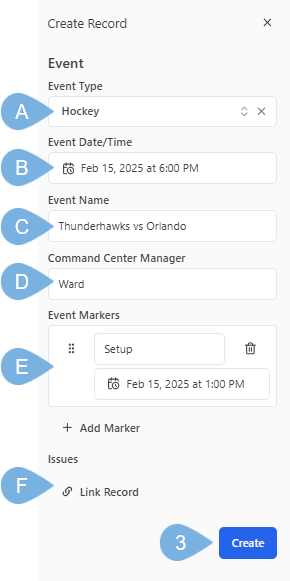
A. Event Type → optional
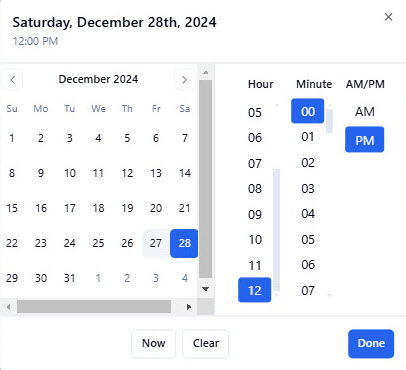
B. Event Date/Time → set by clicking the Calendar icon
C. Event Name
D. Manager's name → optional
E. Event Markers → see Add Event Markers below
F. Issues: Linked Record → see Link Records
Update Events
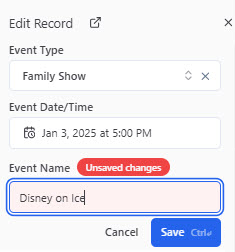
Clicking the Event Controller's Expand icon lets you update an Event on the fly!
- Say you must change the name of an event from Monster Jam to Disney on Ice – and even change the date! (Hey, mistakes happen . . . )
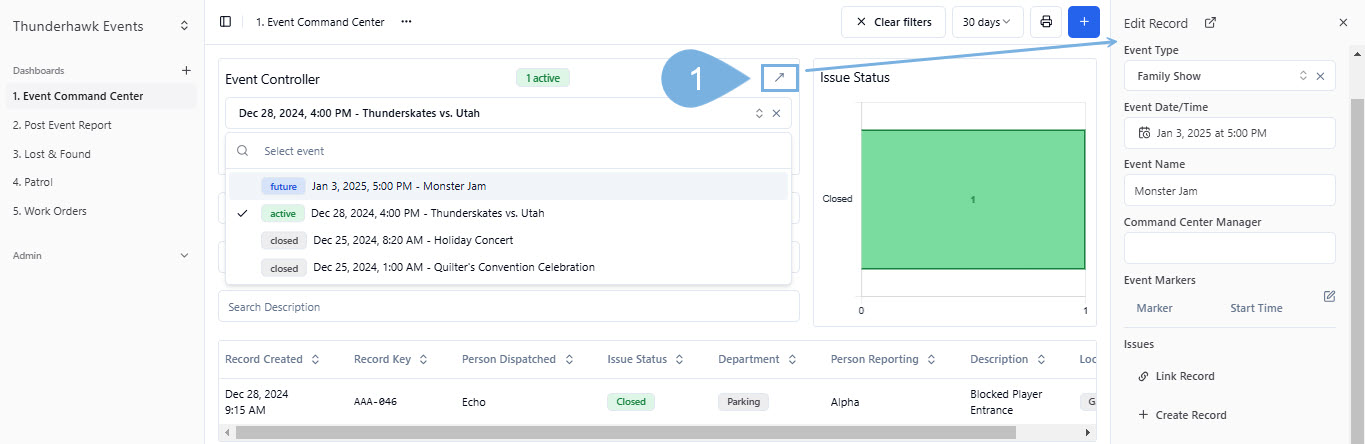
-
Click your Event Controller's Expand icon as indicated above
-
Highlight the Event Name
-
Change the name → and press Save
-
You can also switch out an inaccurate Event Type
-
Change the Date/Time by clicking its Calendar icon and selecting a new date and time → and then click Done
-
Warning: If you change the start Date/Time → be sure to reset the times for your Event Markers by clicking their Calendar icons

Create Records
-
Click the + Blue Create Record icon
-
Select a Form or a Shortcut → ex. + Issue or Event ↓ Hockey

- Shortcuts are customized, pre-populated sub-forms
- With Shortcuts, you can pre-select default Values and hide unnecessary Fields
- Open Shortcuts from drop-down menus next to the primary Form

- For example, Shortcuts for Issues can include Wet Spill, Missing Child, Cleaning Issue, and Unlock-Lock Doors
- Create as many Forms and related Shortcuts as you like!
- Learn more from our Make Shortcuts article
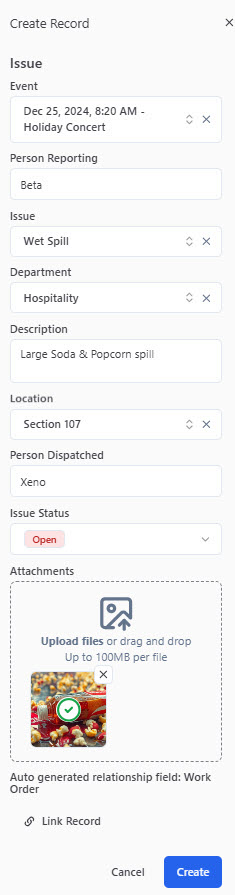
Complete the Form
-
Fill in your Form → then click Create
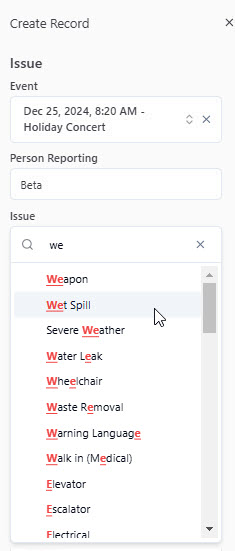
Quickly find your Issue
-
You may have hundreds of Locations and long lists of Issues. To select quickly, simply enter a few letters or numbers →
- we for "Wet Spill"
- s107 for "Level 5, Terrace Level Section 107"
-
Everything matching the letters and numbers will pop up in the blink of an eye. Just pick from the list!

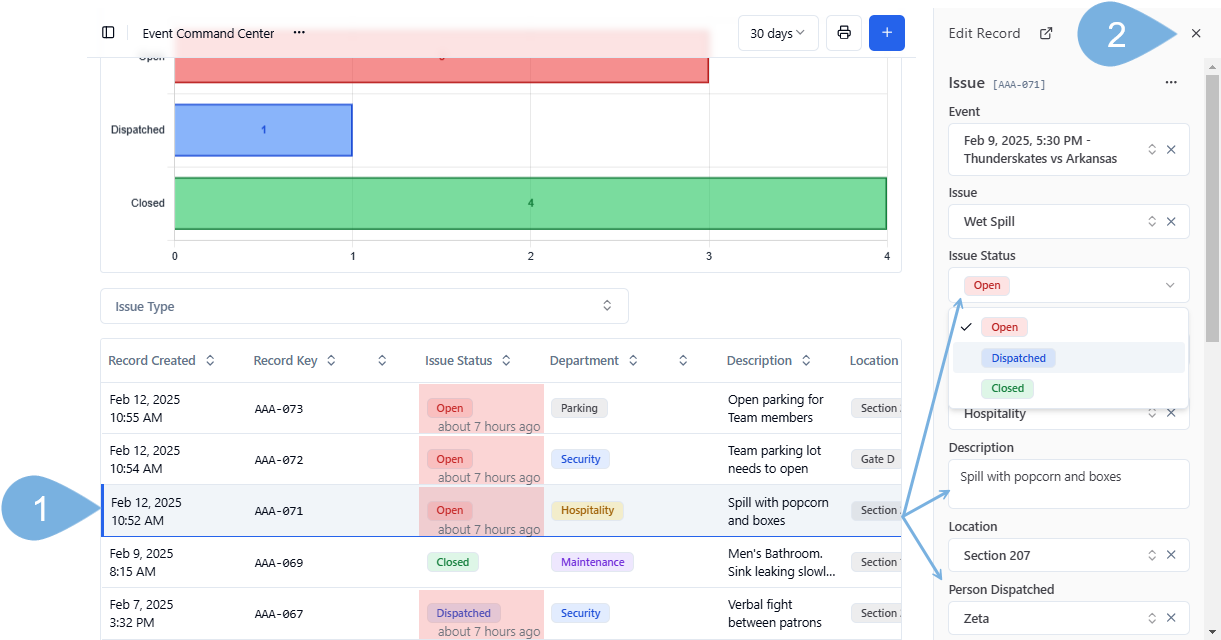
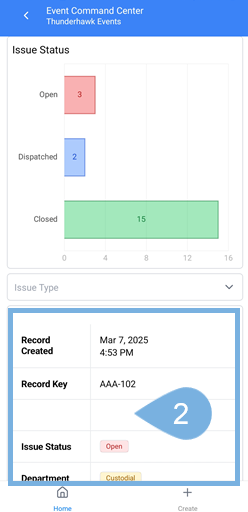
Update Records
-
Open a Dashboard
-
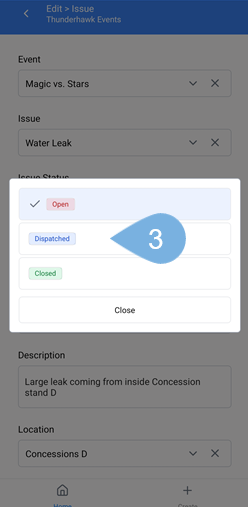
Click open any Record in the Records Table to make changes. For example:
- Change the Status → ex. Reported, Stored, Returned
- Enter updates or corrections → and click Save
- Enter a comment → and click the Comment button
-
Select X to close a Form → or simply click the + Blue icon to start a new Record
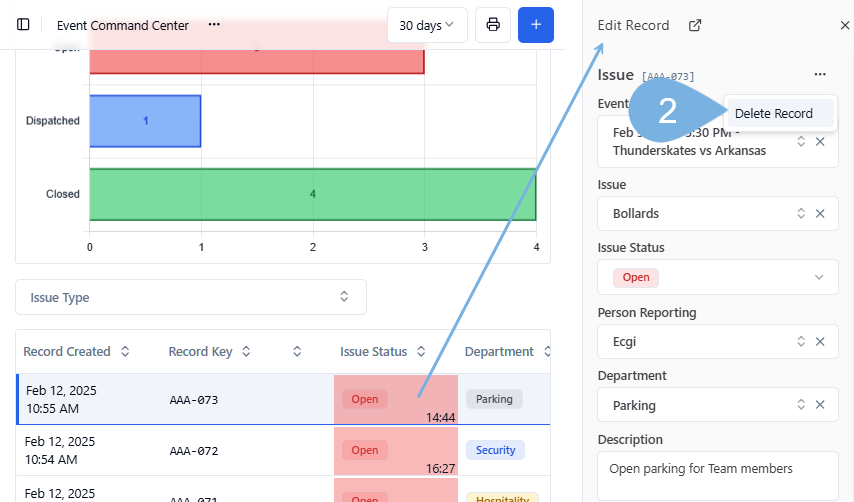
Delete Records
To delete a record:
-
Click the ellipsis (...) at the top of a record in Edit Record view
-
Click Delete Record
-
Click the red Delete button to confirm the deletion

- Permission to delete Records is set in your Role designation
- If you need to delete, consult with your Supervisor, Manager, or Admin, who will contact Guard IQ about a Role update
End of Reading
Mobile App Techniques
Add Events in Mobile
-
Click the + Create Record icon

-
Select Event
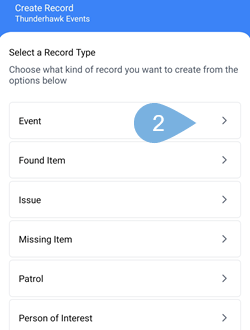
-
Pick a [Shortcut] if it's helpful → ex. Basketball
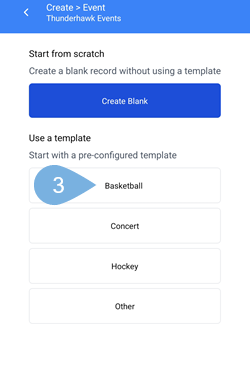 shortcuts
- Shortcuts speed up the creation of recurring events
- Such as → Basketball, Concert, Hockey, or Other events
- Visit the Make Shortcuts guide to learn more
-
Fill in your Event Form
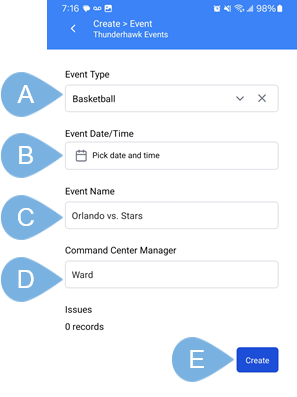
A. Event Type → ex. Basketball
B. Event Date/Time → set by clicking the Calendar icon
C. Event Name → ex. Orlando vs. Stars
D. Command Center Manager's name → ex. Ward
E. Click Create
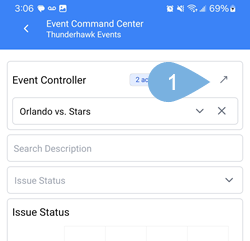
Update Events in Mobile
Clicking the Event Controller's Expand icon lets you update an Event on the fly!
- Say you want to change a city name Orlando in favor of a team name like Magic
- Also, it's easy to adjust the date and time of an event. (Hey, mistakes happen . . . )
-
Click your Event Controller's Expand icon
-
Change an Event Name → or correct a spelling error
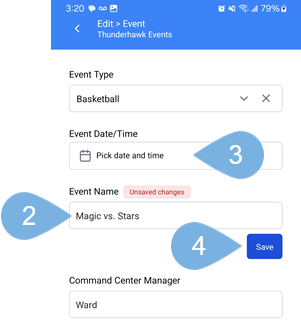
-
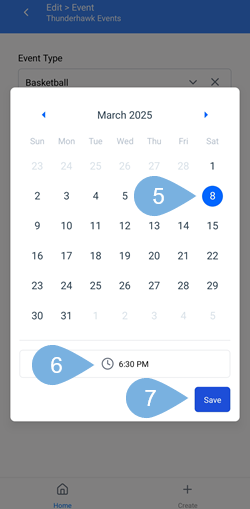
Change the Date/Time by clicking the Calendar icon
-
Select a new date
-
Pick a new time
-
Press Save
Create Records in Mobile
-
Click the + Create Record icon
-
Select the Issue Form
Complete the Form
-
Fill in your Form
- A. Event → ex. Orlando vs. Stars
- B. Issue → ex. Water Leak
- C. Issue Status → ex. default to Open
- D. Person Reporting → ex. Ward
- E. Department → ex. Custodial
- F. Description → ex. Large leak from inside Concession stand D
- G. Location → ex. Concessions D
- H. Person Dispatched → ex. Delta
-
Click Create
Quickly find your Issue in Mobile
-
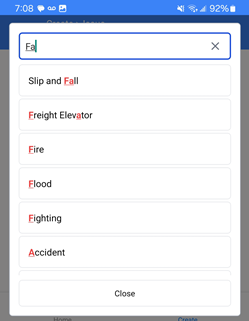
You may have hundreds of Locations and long lists of Issues. To select quickly, simply enter a few letters or numbers →
- w l for "Water Leak"
- Wc for "Wheelchair"
- Fa for "Slip and Fall"
-
Everything matching the letters and numbers will pop up in the blink of an eye. Just pick from the list!


-
Shortcuts are customized, pre-populated sub-forms
-
With Shortcuts, you can pre-select default Values and hide unnecessary Fields
-
Open Shortcuts from drop-down menus next to the primary Form
-
For example, Shortcuts for Issues can include Wet Spill, Missing Child, Cleaning Issue, and Unlock-Lock Doors
-
Create as many Forms and related Shortcuts as you like!
-
Learn more from our Make Shortcuts article
Update Records in Mobile
-
Open your Dashboard
-
Open any Record in the Records Table to make changes
-
Change the Status → ex. Open, Dispatched, Closed
-
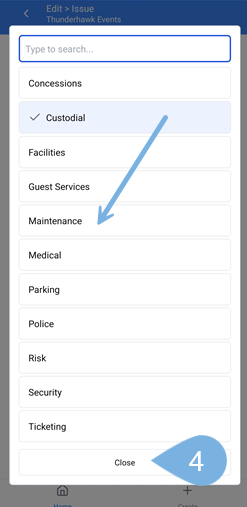
Reassign a Record → ex. from Custodial to Maintance → and click Close
-
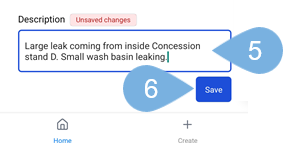
Update a text field by selecting → ex. "Small wash basin leaking"
-
Tap Save to update the text field
-
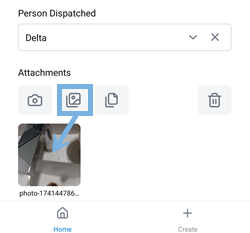
Add an Attachments → ex. Take a picture of the leak
-
Swipe (or back icon on Android) → to return to your Dashboard
End of Reading